Step By Step Guide On How To Easily Dive Into Ethereum
Today, the Ethereum platform has become one of the most recognizable brands in the blockbuster sphere, closely approaching the popularity (and capitalization) of Bitcoin. But due to the lack of a “full-fledged” Russian-speaking guide, domestic developers still do not quite understand what kind of an animal it is and how to work with it. Therefore, in this article, we tried to cover as much as possible all aspects of the development of smart contracts under Ethereum.
we’ll talk about development tools, the YP itself, the process of adding UI and many more interesting things. In the end, we get an ordinary website-business card, but “under the hood”, he will work on smart contracts Ethereum. Whom interested – we ask under the cut.
Content
- Introduction to Ethereum
- Instruments
- Geth
- Parity
- TestRPC
- Mist
- Remix
- Cosmo
- Etheratom
- Solidity
- Create a business card contract
- First step
- Basic Information
- Administration
- Modularity
- Download and delete data
- Return the data
- Deployment
- Adding a UI
- Web3.js
- Metamask
- Deploy with Metamask
- Example
- The result
- Instead of concluding
- References
Introduction to Ethereum
This article is not intended for those who are not familiar with Ethereum (or blocking technology at all), so there will not be an explanation of basic things like blocks, transactions or contracts. we mean that you are at least a little aware of what’s going on. Otherwise, leaf through the articles from the list below, and then come back 🙂
- A 101 Noob Intro to Programming Smart Contracts on Ethereum
- Ethereum for web developers
- Building a smart contract using the command line
- Create your own crypto-currency
- Dapps for Beginners
More links to interesting articles you will find at the end.
P.S. I’m working under Ubuntu 16.04, so the entire installation, development and deployment process will be described under this OS. Nevertheless, all the tools used are cross-platform (most likely, they did not), so if you want, you can experiment on other OSes.
Instruments
Geth
Working with Ethereum is possible through a huge number of clients, some of which are terminal-based, part of the GUI and there are several hybrid solutions. A kind of standard is [Geth] (), which is developed by the team Ethereum. About him, we already wrote in previous articles, but just in case we repeat.
The client is written on Go, installed in the standard way:
sudo apt-get install software-properties-common
sudo add-apt-repository -y ppa:ethereum/ethereum
sudo apt-get update
sudo apt-get install ethereum
Geth itself does not have a GUI, but working with it from the terminal is pretty nice. Here the entire set of command-line arguments is described, we will describe a few of the most popular ones.
Here is the command that we use most often in work: $ geth –dev –rpc –rpcaddr “0.0.0.0” –rpcapi “admin, debug, miner, shh, txpool, personal, eth, net, web3” console
- –dev runs geth in private block mode, that is, it does not synchronize the main / test branch. Instead, you get a sterile chain without a single block. This is the most convenient option in terms of development, as, for example, the unit mining takes several seconds and there is no load on the network or disk.
- –rpc includes an RPC-HTTP server. In fact, this is an API to your node – through it, third-party applications, such as wallets or IDEs, can work with the blockbuster: download contracts, send transactions, and so on. By default it runs on localhost: 8545, you can change these parameters with –rpcaddr and –rpcport, respectively.
- –rpcapi sets something like the permissions for applications connected to the RPC server. For example, if you do not specify “miner”, then by connecting to the node of the wallet and running the miner, you will get an error. In the example, we indicated all possible rights, you can read more here.
- console – as you might guess, this option starts the developer console. It supports the most common JS and a number of built-in functions for working with Ethereum, here is a simple example (point – Raising the node).
Parity
Geth is pretty good, but more recently, you can often meet another client – Parity, written in Rust. Its main difference from Geth is the built-in web interface, in my opinion, the most convenient among all the existing ones. Installation:
sudo <(curl https://get.parity.io -Lk)
After the download is complete, start the parity console and at localhost: 8180, you can find the wallet itself.

Another plus: Parity is faster than its competitors. At least so the authors claim, but according to my feelings, this is really so, especially in terms of synchronization of the blockade.
The only nuance is that there is no console in the parity. But you can easily use for these purposes Geth:
$ parity --geth # Run parity in Geth mode
$ geth attach console # Attach Geth to the PArity node (Do it in another window)
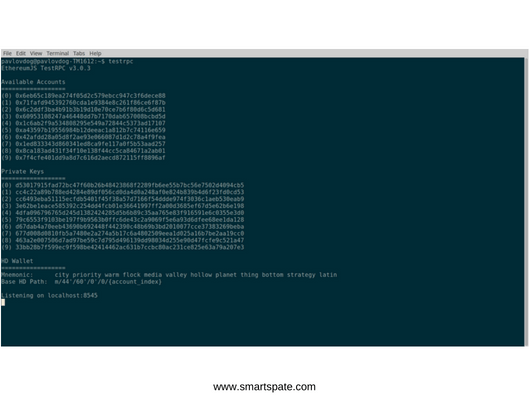
TestRPC
This tool, unlike the previous ones, will be used only for developers. It allows one testrpc command to raise a private lock-up with RPC protocol enabled, a dozen pre-created accounts with e-mails on the account, a working miner, and so on. The whole list is here. In fact, testrpc is the same geth –dev –rpc …, only this time you do not need to spend time creating accounts, turning on / off the miner and other routine activities.
Installation – npm install -g ethereumjs-testrpc.
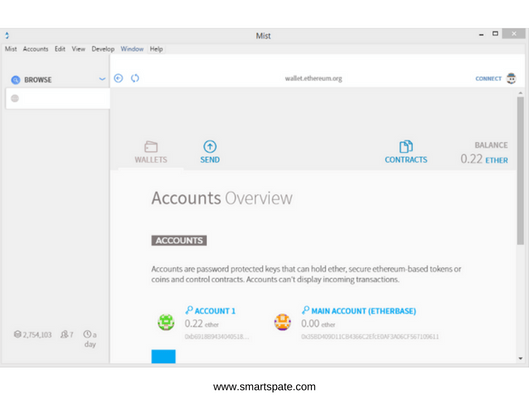
Mist
The most popular wallet for Ethereum, although in fact, he knows a lot more. Here’s a great article, where step-by-step explains the whole process of working with Mist. Download the latest version from the release page. In addition to working with the wallet, there is the possibility of working with contracts.
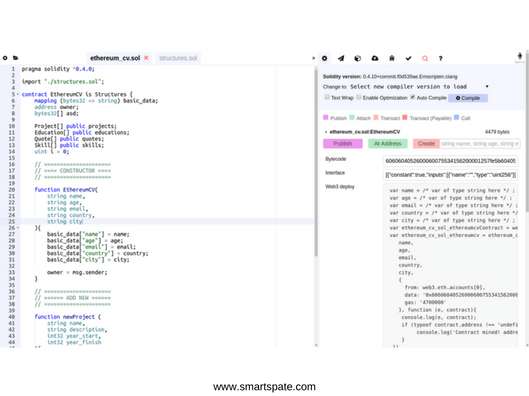
Remix
The most popular IDE for contract development. Works in the browser at ethereum.github.io/browser-solidity/ support a huge number of functions:
- Connecting to the specified RPC provider
- Compiling the code in bytecode/opcodes
- Publication in Github Gist
- Step by Step Debugger
- Calculation of the cost of performance of functions in gas
- Saving your code in the local storage
- And much more
There is no autocomplete, which is very sad.
Cosmo
Another IDE for developing smart contracts, written on Meteor, works out of the box. First, open a new terminal and raise the node with RPC enabled. Geth –rpc –rpcapi = “db, eth, net, web3, personal” –rpcport “8545” –rpcaddr “127.0.0.1” –rpccorsdomain “localhost “console. After that, you can run the IDE itself:
$ git clone http://github.com/SilentCicero/meteor-dapp-cosmo.git
$ cd meteor-dapp-cosmo/app
$ meteor
Next, open localhost: 3000 and you can start working:

Etheratom
The latest tool for accelerating the development of smart contracts. This plugin for the Atom editor is installed using apm install atom-ethereum-interface. Stuka convenient, we use it myself. Allows you to work with JS EVM or connect to the node via RPC. Compiles the contract to CTRL + ALT + C, to the network on CTRL + ALT + S. Well, it provides a good interface for working with the contract itself
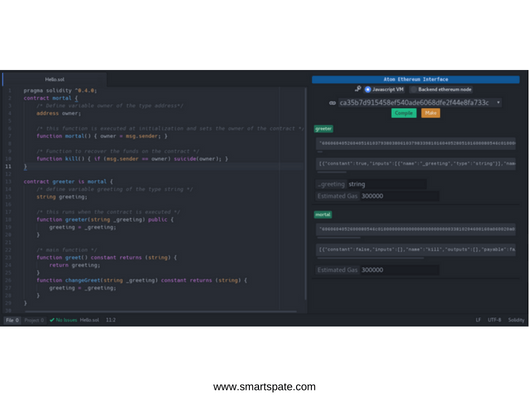
If you do not need such a sophisticated functionality inside the editor, then for Atom there is a separate plugin with the highlight of the syntax Solidity – language-ethereum. The latter is essentially a plugin for Sublime text, only converted to work in Atom.
Solidity
Perhaps you’ve heard about the fact that you can write contracts not only on Solidity but also in other languages, for example, Serpent (looks like Python). But the last comet in the develop branch of ethereum/serpent was about six months ago, so, apparently, the language, alas, was deprecated.
Therefore, we will write only on Solidity. So far, the language is at a relatively early stage of development, so there are no complex designs or unique abstractions in it. Therefore, separately to talk about him we do not see the point – anyone with experience in programming will be free to write on it after 20 minutes of reading the documentation. In case you do not have such experience, – below we commented quite extensively on the whole code of the contract.
For self-study there are some very good examples with the most detailed descriptions:
- Voting contract
- Blind Auction
- Safe Remote Purchase
- Or, already become an analog of “Hello, World” in the world of contracts, – Greeter contract
Once again we will note (excellent!) The documentation of the language, in some places even translated into Russian.
Create a business card contract
It’s time to create our contract. Ultimately, this will be a business card application, to which we will put the “summary” itself:
- Name, mail, contacts and so on
- List of projects
- Education: universities, courses, etc.
- Skills
- Publications
First step
First, we create a contract template and a constructor function. It should be called as well as the contract itself and is called only once – when the contract is loaded into the block. We will use it to initialize one single variable – address owner. As you probably already guessed, it will record the address of the one who filled the contract in the network. And it will be used to implement the functions of the contract administrator, but more on that later.
pragma solidity ^0.4.0;

contract EthereumCV is Structures {
address owner;

// =====================
// ==== CONSTRUCTOR ====
// =====================
function EthereumCV() {
owner = msg.sender;
}
}
Basic Information
The next step is to add the ability to specify basic information about the author – name, mail, address and so on. To do this, we will use the most common mapping, which should be declared at the beginning of the contract:
address owner;
mapping (string => string) basic_data;
In order to be able to “get” this data from the contract, we create the following function:
function getBasicData (string arg) constant returns (string) {
return basic_data[arg];
}
Everything is simple, just note the constant modifier – it can (and should be) used for those functions that do not change the state application. The main advantage of such functions (sic!), Is that they can be used as usual functions.
Administration
Now you should think about filling your resume with content. In the simplest case, we could dispense with a function like so:
function setBasicData (string key, string value) {
basic_data[key] = value;
}
But in this case, anyone, if desired, could change, for example, our name by calling setBasicData (“name”, “New Name”). Fortunately, there is a way of just one line to stop any such attempts:
function setBasicData (string key, string value) {
if (msg.sender != owner) { throw; }
basic_data[key] = value;
}
Since we will not have to use such a construction more than once (when adding a new project, for example), it’s worth creating a special modifier:
modifier onlyOwner() {
if (msg.sender != owner) { throw; }
_; // Will be replaced with function body
}

// Now you can use it with any function
function setBasicData (string key, string value) onlyOwner() {
basic_data[key] = value;
}
If desired, you can use other authorization methods, such as a password. The hash will be stored in the contract and compared with the entered for each function call. But it is clear that this method is not so safe, the benefit of iridescent tables and dictionary attacks has not been canceled. On the other hand, our method is also not ideal, since if you lose access to the owner address, then you will not be able to edit anything.
Modularity
The next step is to create several structures for describing projects, education, skills, and publications. Here everything is simple, structures are described exactly the same as in C. But instead of describing them in the current contract, we’ll take them to a separate library (in a new file). This way we can avoid huge code sheets and structure our project.
To do this, in the same directory, create a new structure.sol file and the Structures library. And already inside it, we describe each of the structures:
pragma solidity ^0.4.0;

library Structures {
struct Project {
string name;
string link;
string description;
}

struct Education {
string name;
string speciality;
int32 year_start;
int32 year_finish;
}

struct Publication {
string name;
string link;
string language;
}

struct Skill {
string name;
int32 level;
}
}
Now you only need to import the resulting file.
pragma solidity ^0.4.0;

import "./structures.sol";

contract EthereumCV {
mapping (string => string) basic_data;
address owner;

Structures.Project[] public projects;
Structures.Education[] public educations;
Structures.Skill[] public skills;
Structures.Publication[] public publications;

// ...
}
The cleverest have already guessed that the Structures. Project [] projects notation means creating a dynamic array with Project elements. But with the modifier public is already more complicated. In fact, it replaces the writing of a function like get_project (int position) {return projects [position]; } – the compiler itself will create such a function. It will be named as a variable, in our case – projects.
You can ask – why did not we first write mapping (string => string) public basic_data, and instead created this function yourself? The reason is banal – the public does not yet know how to work with variables for which the key is a dynamic data type (string is just this type).
Unimplemented feature (/src/libsolidity/codegen/ExpressionCompiler.cpp:105): Accessors for mapping with dynamically-sized keys not yet implemented.
To do this, you need to declare basic_data as for example mapping (bytes32 => string).
BTW Just in case, we note that in addition to the local file, Remix can import .sol files by reference to Github and even using the Swarm protocol (this is something like a distributed storage for Ethereum, for more details click here)
Download and delete data
We think many of you already guessed how to work with new data. we’ll show you the example of the list of publications, otherwise, everything is the same:
function editPublication (bool operation, string name, string link, string language) onlyOwner() {
if (operation) {
publications.push(Structures.Publication(name, link, language));
} else {
delete publications[publications.length - 1];
}
}
Using the operation parameter, we got rid of writing a separate function to delete the last publication (crutch, but we are just learning). Although it should be noted that this method of getting rid of an element in an array is not really correct. The element itself will, of course, be deleted, but there will be an empty space in place of the index. In our case, this is not fatal (we will check the emptiness of individual elements on the client side), but, generally speaking, this should not be forgotten. Moreover, moving the entire array and reducing the length counter is not so difficult.
Return the data
As we said, the public modifier in the Project [] line public projects provided us with a function that returns the projects [i] by the i-index. But we do not know how many projects we have, and there are two ways. The first is to iterate over we until we get an error about the nonexistent element. The second is to write a separate function that will return the size of projects to us. we will go the second way, a little later we will say why:
function getSize(string arg) constant returns (uint) {
if (sha3(arg) == sha3("projects")) { return projects.length; }
if (sha3(arg) == sha3("educations")) { return educations.length; }
if (sha3(arg) == sha3("publications")) { return quotes.length; }
if (sha3(arg) == sha3("skills")) { return skills.length; }
throw;
}
Notice that we can not compare two strings in the usual way ‘aaa’ == ‘bbb’. The reason is the same, a string is a dynamic data type, working with them is quite painful. So it remains either to compare the hashes or to use the function for character-by-symbol comparison. In this case, you can use the popular library stringUtils.sol, it has this function.
Deployment
In different development environments, the process of compilation and de-build is certainly different, so we will limit yourself to Remix as the most popular.
First, of course, fill in all the code (you can find the final version in the project repository). Next, in the Select execution environment drop-down list, select Javascript VM – for now, we’ll test the contract for the JS emulator of the block, we’ll learn how to work with the present later. If the contract is in order, then you will be available to the Create button – click and see:
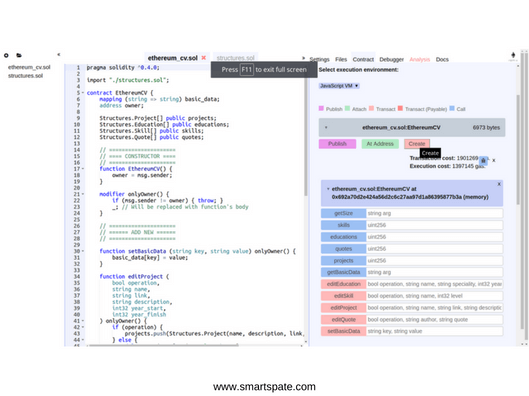
Now, when the contract is poured into the block system (its emulation, but not the essence), we can try to call some function and see what happens. For example, you can save the email in the contract – for this, find the function setBasicData, fill in the field and click the button with the function name:

The function does not return anything, so result: 0x. Now you can request an email from the contract: look for the getBasicData function and try:

With other functions, we suggest you experiment yourself.
Adding a UI
Below we will tell you about the most common way to add UI to your contract. It allows using JS and HTML to create interfaces of any complexity, it is enough to have access to the working node Ethereum (or its analogs).
Web3.js
This is the Ethereum compatible JavaScript API which implements the Generic JSON RPC spec. It’s available on npm as a node module, for bower and component as an embeddable js and as a meteor.js package.
This is a JS library that allows you to use the Ethereum API with conventional JS. In fact, using it, you just connect to the node and you have something like the geth console in the browser. It is installed through npm or bower:
$ sudo npm install web3
$ bower install web3
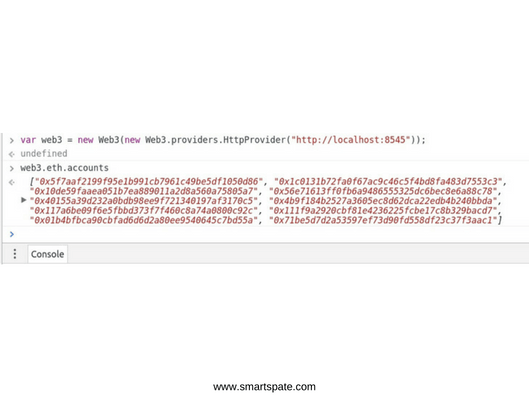
Here is an example of working with web3 via node.js (pre-run testrpc or any other node with RPC interface):
$ node
> var Web3 = require('web3');
> var web3 = new Web3(new Web3.providers.HttpProvider("http://localhost:8545"));
> web3.eth.accounts
[ '0x5f7aaf2199f95e1b991cb7961c49be5df1050d86',
'0x1c0131b72fa0f67ac9c46c5f4bd8fa483d7553c3',
'0x10de59faaea051b7ea889011a2d8a560a75805a7',
'0x56e71613ff0fb6a9486555325dc6bec8e6a88c78',
'0x40155a39d232a0bdb98ee9f721340197af3170c5',
'0x4b9f184b2527a3605ec8d62dca22edb4b240bbda',
'0x117a6be09f6e5fbbd373f7f460c8a74a0800c92c',
'0x111f9a2920cbf81e4236225fcbe17c8b329bacd7',
'0x01b4bfbca90cbfad6d6d2a80ee9540645c7bd55a',
'0x71be5d7d2a53597ef73d90fd558df23c37f3aac1' ]
>
The same, only from the JS console of the browser (do not forget about <script src = “path_to / web3.js”> </ script>).
That is, we can already start the node at this moment, synchronize it with the current chain and will only have to make our application. But there are two subtle points: firstly, you need to synchronize the Ethereum block system, and you probably have not done so yet.
The second nuance is that RPC does not have any built-in authorization mechanism, so anyone can find out the address of your node from the JS source code and use it for your own pleasure. Here, of course, you can write some wrapper on Nginx with the simplest HTTP basic auth, but it’s somehow some other time.
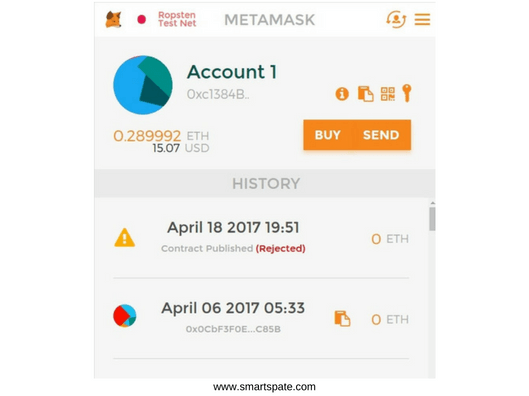
Metamask
So now we will use the Metamask plug-in (alas, only for Chrome). In fact, this is the layer between the node and the browser, which will allow you to use web3 in the browser, but without its node. Metamask works very simply – in each page, it embeds web3.js, which automatically connects to RPC servers Metamask. After that, you can use Ethereum to the fullest.
After installing the plug-in, in the upper left corner select Testnet and get several others on the Metamask crane. At this point, you should get something like this (with a clean history of course):
Deploy with Metamask
With Metamask, contracting a network is as simple as in the case of JS EVM. To do this, open Remix again and select the Injected Web3 item in the Select execution environment list (most likely it is selected automatically). After that click on Create and see the pop-up window:
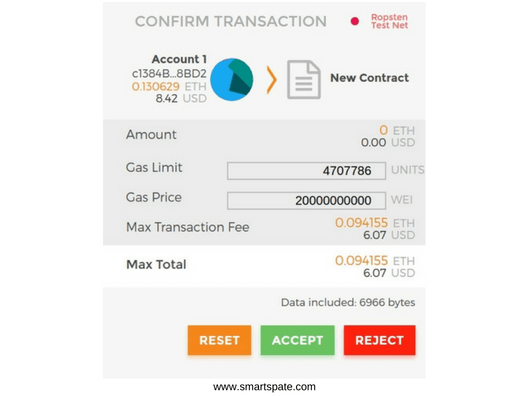
A little later, the inscription Waiting for the transaction to be mined … will be replaced by information on the published contract – it means that he got into the block. You can find out the contact address by opening Metamask and clicking on the record of the type:

However, now, if you want, for example, to call the function editProject (…), you also have to confirm the transaction and wait until it is wrapped in a block.
Example
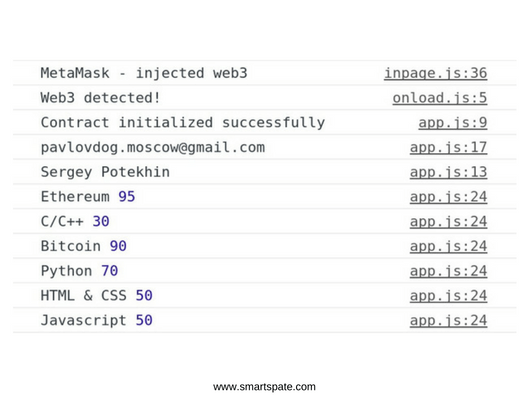
Now it’s a small matter – you need to learn how to get data from a contract through Web3. To do this, first, you need to learn to determine the presence of web3 on the
window.addEventListener('load', function() {
// Checking if Web3 has been injected by the browser (Mist/MetaMask)
if (typeof web3 !== 'undefined') {
// Use Mist/MetaMask's provider
console.log("Web3 detected!");
window.web3 = new Web3(web3.currentProvider);
// Now you can start your app & access web3 freely:
startApp()
} else {
alert('Please use Chrome, install Metamask and then try again!')
}
})
Inside startApp (), we defined the whole logic of working with the contract, thereby avoiding false positives and errors.
function startApp() {
var address = {
"3" : "0xf11398265f766b8941549c865d948ae0ac734561" // Ropsten
}

var current_network = web3.version.network;
// abi initialized ealier, in abi.js
var contract = web3.eth.contract(abi).at(address[current_network]);

console.log("Contract initialized successfully")

contract.getBasicData("name", function(error, data) {
console.log(data);
});

contract.getBasicData("email", function(error, data) {
console.log(data);
});

contract.getSize("skills", function(error, data) {
var skills_size = data["c"][0];
for (var i = 0; i < skills_size; ++i) {
contract.skills(i, function(error, data) {
// Don't forget to check blank elements!
if (data[0]) { console.log(data[0], data[1]["c"][0]); }
})
}
})
}
The result
Now that you’ve sorted it all out, you can take on the layout and JS. I used Vue.js and Spectre.css, for visualization skills we added Google Charts. You can see the result on pavlovdog.github.io

Conclusion
You just saw how you can create an application that uses blockchain technology most directly. Although in the pursuit of simplicity (all the same it’s a teaching article), we made some simplifications that cannot be tolerated in a good way.
- For example, we use someone’s gateway (I’m talking about Metamask), instead of working with my node. This is convenient, but the technology of blocking in the first place is decentralization and the absence of intermediaries. At us all this is not present – we trust guys from Metamask.
Another, not so critical problem – we forgot about the cost of the de-contracting and transactions to them. In practice, it costs ten times to think before using string instead of bytes, because such things primarily affect the costs when working with the contract. Again, in the example we used Testnet, so we did not spend any money, but when working with the Main net, you should not be so wasteful.
In any case, we hope that the article was useful, if there are questions – ask in the comments.
And, For those who are interested in an even more detailed breakdown such as:
- The history of Ethereum
- How does transaction work?
- What is Ethereum used for?
- Smart Contracts.
- Ethereum Hacks.
- Parity Hacks
And even more, we highly recommend visiting a King Passive powered by Julian Goldie for those how wants to learn but don’t really know how to get started.
References
- What is Ethereum?
- MetaMask
- Learning Solidity Part 1: Contract Dev with MetaMask
- Learning Solidity Part 2: Commit-Reveal Voting
- How to use MetaMask
- Building an “Oracle” for an Ethereum contract
- Full Stack Hello World Voting Ethereum Dapp Tutorial – Part 1
- Full Stack Hello World Voting Ethereum Dapp Tutorial – Part 2


