Practical Guide On How to Apply And Use a Service Workers Script
The number of Internet outlets from mobile devices grows annually by 2-4% per year. The quality of communication does not keep pace at such rates. As a result, even the best web application will provide a terrible experience if the user cannot download it.
- The problem is that there is still no good mechanism for managing the resource cache and the results of network requests. In my article, I want to talk about how the Service Worker (SW) can help in this task. I will explain in the format of recipes – what elements and in what proportion to mix to get the desired result, based on the task and requirements.
Before the advent of SW, the problem of working in offline mode was solved by another API – AppCache. However, along with the pitfalls, AppCache featured the fact that it works fine in single-page applications, but not very suitable for multi-page sites. SW was designed to avoid these problems.
What is Service Worker?
First, it is a script that the browser runs in the background, separate from the page, opening the door for features that do not require a web page or interaction with the user. Today they perform such functions as push notifications and background synchronization, in the future SW will support other things. Their key feature is the ability to intercept and process network requests, including program management of response caching.
- Second, the SW is run in the worker context, so it does not have access to the DOM and it works in a thread separate from the main JavaScript stream that manages your application, and therefore does not block it. It is designed to be completely asynchronous, so you can not use synchronous APIs (XHR and LocalStorage) in SW.
Thirdly, for security reasons, SW only work on HTTPS, because giving outsiders the ability to change network requests is extremely dangerous.
What should be cached?
In order for the application to become more responsive, we need to cache all static files:
- JS (vendor, chunks)
- CSS
- Media content (photo, video, fonts)
Why can not we use LocalStorage for this situation?
Everything is very simple. LocalStorage is a synchronous API, has a limit of 5MB and allows you to store only rows.
SW is better with this: it is asynchronous, it is a proxy for requests, which allows you to process and cache any request and according to the article Offline Storage for Progressive Web Apps from Eddie Osmani:
- Chrome/Opera: both stores will store data until they reach the browser limit. In fact, this is an unlimited space (more in the Quota Management API and Persistent Storage).
- Firefox: no restrictions, confirmation after 50MB.
- Mobile Safari: limit of 50MB.
- Desktop Safari: no restrictions, confirmation after 5MB.
- IE10 +: 250MB maximum and confirmation at 10MB.
I already like the Service Worker. How to use it?
Below I will walk you through the recipes for preparing SW to create responsive and understandable applications.
Blanks for the preparation of Service Workers
To write your own SW we will need:
- index.html
- index.js
- sw.js
All you need to do is to index.html connect index.js, which will register the file sw.js
// Check that our browser supports the Service Worker API.
if ('serviceWorker' in navigator) {
// All the registration code is asynchronous.
navigator.serviceWorker.register ('./ sw.js')
.then (() => navigator.serviceWorker.ready.then ((worker) => {
worker.sync.register ('syncdata');
}))
.catch ((err) => console.log (err));
}
In the sw.js file, we only need to define the basic events that the SW will respond to.
self.addEventListener ('install', (event) => {
console.log ('Installed');
});

self.addEventListener ('activate', (event) => {
console.log ('Activated');
});

self.addEventListener ('fetch', (event) => {
console.log ('There is a request to the server');
});
Details about lifecycle for SW you can learn from this article.
Recipe # 1 – Network or cache
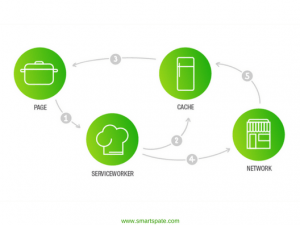
Suitable for media sites, where there is a lot of media content. Pictures and videos can be given for a long time, our task is to cache them. On subsequent requests to the server, we will return data from the cache. We mean that the data can be irrelevant, for us the main thing here is to save the user from waiting for the files to be downloaded.

Decision
This option is suitable if the download speed of content for you is a priority, but I would like to show the most current data.
The mechanism of work is the following: there is a request for a resource with a time limit, for example, 400ms, if the data was not received during this time, we give them out of the cache.
SW in this recipe tries to get the most current content from the network, but if the request takes too much time, then the data will be taken from the cache. This problem can be solved by setting the timeout to the request.
const CACHE = 'network-or-cache-v1';
const timeout = 400;
// When installing the vorker, we have to cache some data (statics).
self.addEventListener ('install', (event) => {
event.waitUntil (
caches.open (CACHE) .then ((cache) => cache.addAll ([
'/ img / background'
])
));
});

// at the fetch event, we make a request, but use the cache only after the timeout expires.
self.addEventListener ('fetch', (event) => {
event.respondWith (fromNetwork (event.request, timeout)
.catch ((err) => {
console.log (`Error: $ {err.message ()}`);
return fromCache (event.request);
}));
});

// Temporarily-limited query.
function fromNetwork (request, timeout) {
return new Promise ((fulfill, reject) => {
var timeoutId = setTimeout (reject, timeout);
fetch (request) .then ((response) => {
clearTimeout (timeoutId);
fulfill (response);
}, reject);
});
}

function fromCache (request) {
// Open our cache store (CacheStorage API), search for the requested resource.
// Note that if Promise does not match, Promise will succeed, but with the value of `undefined`
return caches.open (CACHE) .then ((cache) =>
cache.match (request) .then ((matching) =>
matching || Promise.reject ('no-match')
));
}
Recipe # 2 – Cache only
An ideal recipe for landings, whose task is to show the user a product and thereby detain his attention on the site. Slow downloading of content with a bad connection, in this case, is simply unacceptable, so the priority of this recipe is the retrieval of data from the cache for any connection. The exception is the first request and cleaning the cache. The downside is that if you change the content, users will have a change after the cache becomes invalid. By default, SW will re-register 24 hours after installation.

Decision
All we do is, when registering SW, we put all our static resources into the cache; In subsequent calls to resources, SW will always respond with data from the cache.
const CACHE = 'cache-only-v1';

// When installing the vorker, we have to cache some data (statics).
self.addEventListener ('install', (event) => {
event.waitUntil (
caches.open (CACHE) .then ((cache) => {
return cache.addAll ([
'/ img / background'
]);
})
);
});

// When requesting a server (fetch event), we use only data from the cache.
self.addEventListener ('fetch', (event) =>
event.respondWith (fromCache (event.request));
);

function fromCache (request) {
return caches.open (CACHE) .then ((cache) =>
cache.match (request)
.then ((matching) => matching || Promise.reject ('no-match'))
);
}
Recipe # 3 – Cache and update
This recipe solves the problem of the relevance of the data, which was not in recipe number 2.
In other words, we will get the updated content, but with a delay until the next page load.
Decision
As in the previous version, in this recipe, SW first responds from the cache to deliver quick responses, but it updates the cache data from the network.
const CACHE = 'cache-and-update-v1';

// When installing the vorker, we have to cache some data (statics).
self.addEventListener ('install', (event) => {
event.waitUntil (
caches.open (CACHE) .then ((cache) =>
cache.addAll (['/ img / background']))
);
});

// at the fetch event, we use the cache, and only then we update it from the server
self.addEventListener ('fetch', function (event) {
// We use `respondWith ()` to instantly respond without waiting for a response from the server.
event.respondWith (fromCache (event.request));
// `waitUntil ()` is needed to prevent the worker from stopping before the cache is updated.
event.waitUntil (update (event.request));
});

function fromCache (request) {
return caches.open (CACHE) .then ((cache) =>
cache.match (request) .then ((matching) =>
matching || Promise.reject ('no-match')
));
}

function update (request) {
return caches.open (CACHE) .then ((cache) =>
fetch (request) .then ((response) =>
cache.put (request, response)
)
);
}
Recipe # 4 – Cache, update and refresh
Extension of the recipe number 3. In this solution, we update the content in the background, but we can always tell the user that the data on the page has changed. An example is the creation of applications in which the content is edited in the background. So, you read the article on the news site and receive a notification that the data on the page has been updated and more recent information has appeared.


Decision
The recipe allows the SW to respond from the cache to give quick replies and to update the data in the cache from the network. When the query succeeds, the user interface will be updated automatically or through UI-control.
Use the content data from the cache, but at the same time, perform a request to update the cache entry and inform the UI about the new data.
const CACHE = 'cache-update-and-refresh-v1';

// When installing the vorker, we have to cache some data (statics).
self.addEventListener ('install', (event) => {
event.waitUntil (
caches
.open (CACHE)
.then ((cache) => cache.addAll (['/ img / background']))
);
});

// When requesting a server, we use the data from the cache and only after we go to the server.
self.addEventListener ('fetch', (event) => {
// As in the previous example, first `respondWith ()` then `waitUntil ()`
event.respondWith (fromCache (event.request));
event.waitUntil (
update (event.request)
// At the end, after receiving the "fresh" data from the server, we notify all clients.
.then (refresh)
);
});

function fromCache (request) {
return caches.open (CACHE) .then ((cache) =>
cache.match (request) .then ((matching) =>
matching || Promise.reject ('no-match')
));
}

function update (request) {
return caches.open (CACHE) .then ((cache) =>
fetch (request) .then ((response) =>
cache.put (request, response.clone ()). then (() => response)
)
);
}

// Send updates to all clients.
function refresh (response) {
return self.clients.matchAll (). then ((clients) => {
clients.forEach ((client) => {
// Read more about ETag here
// https://en.wikipedia.org/wiki/HTTP_ETag
const message = {
type: 'refresh',
url: response.url,
eTag: response.headers.get ('ETag')
};};
// Notify the client about the update of the data.
client.postMessage (JSON.stringify (message));
});
});
}
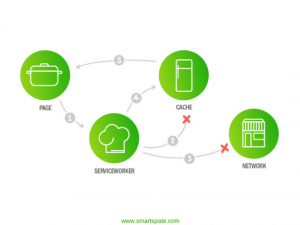
Recipe # 5 – Embedded fallback
There is a problem when the default browser gives you a message that you are offline. I call it a problem, because:
- The screen is different from your application.
- The screen looks different in each browser.
- The message cannot be localized.

The best solution in this situation would be to show the user a custom snippet of the offline cache. With SW, we can prepare a pre-prepared answer saying that the application is off-line and its functionality is limited for a certain time.
Decision
You need to give backpack data if you do not have access to resources (network and cache).
Data is prepared in advance and put as static resources, available SW.
const CACHE = 'offline-fallback-v1';

// When installing the vorker, we have to cache some data (statics).
self.addEventListener ('install', (event) => {
event.waitUntil (
caches
.open (CACHE)
.then ((cache) => cache.addAll (['/ img / background']))
// `skipWaiting ()` is needed because we want to activate SW
// and monitor it immediately, and not after reboot.
.then (() => self.skipWaiting ())
);
});

self.addEventListener ('activate', (event) => {
// `self.clients.claim ()` allows the SW to start intercepting requests from the beginning,
// this works along with `skipWaiting ()`, allowing you to use `fallback` from the very first requests.
event.waitUntil (self.clients.claim ());
});

self.addEventListener ('fetch', function (event) {
// You can use any strategy described above.
// If it does not work correctly, then use `Embedded fallback`.
event.respondWith (networkOrCache (event.request)
.catch (() => useFallback ()));
});

function networkOrCache (request) {
return fetch (request)
.then ((response) => response.ok? response: fromCache (request))
.catch (() => fromCache (request));
}

// Our Fallback together with our own dinosaur.
const FALLBACK =
'<div> \ n' +
'<div> App Title </ div> \ n' +
'<div> you are offline </ div> \ n' +
'<img src = "/ svg / or / base64 / of / your / dinosaur" alt = "dinosaur" /> \ n' +
'</ div>';

// He will never fall, because we always give pre-prepared data.
function useFallback () {
return Promise.resolve (new Response (FALLBACK, {headers: {
'Content-Type': 'text / html; charset = utf-8 '
}}));
}

function fromCache (request) {
return caches.open (CACHE) .then ((cache) =>
cache.match (request) .then ((matching) =>
matching || Promise.reject ('no-match')
));
}
Conclusion
Above we considered the basic recipes for SW applications for applications.
They are described as they become more complex. If you have simple lending, you do not have to climb into the jungle, just use Cache only or Network or cache. For more complex applications, use the rest of the recipes.
The article was conceived as an initial in a series of articles on the SW API. I want to understand how interesting and useful the topic is. I await your comments and wishes.
