
Step by Step guide on how to create 2G network at your own home
In this article, We would like to describe in detail how we managed to launch our own GSM network with the help of Osmocom and modest investments in equipment.
The instructions on the official website are out of date and we had to spend quite a lot of time on their adaptation. Fortunately, all the problems have been solved, and if you strictly follow the instruction below, then you will succeed.
- As a result, we will launch an experimental 2G cellular network within a room with SMS support and voice calls, without GPRS. It can be used to study the operation and interaction of devices and components of the GSM network without interfering with commercial cellular networks.
Attention!
The author does not bear any responsibility for the actions of other users, their interference in commercial GSM networks and damage to their own equipment. Before anything starts, make sure that you understand what you are doing.
Hardware and Software
Hardware
- Computer with 32 bit Ubuntu 14.04 installed (not a virtual)
- 2 phones on the TI Calypso chipset (Motorola c113, c118, c123, …)
- 2 USB-TTL converter
- 2 wires (2.5 mm jack + jumper)
Software
- Transceivers based on OsmocomBB
- Base station based on OsmoBTS
- Base station controller based on OsmoBSC
- MSC, HLR, SMS center based on OsmoNTIB
Cellphone
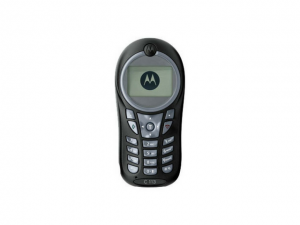
Cellphones on the TI Calypso chipset will be the easiest to find on the sites of free ads in your city. The price varies from 30 to 100 dollars, depending on the condition and availability of the charger. We recommend paying attention to the working GSM bands. You need phones that work with 900 MHz and 1800 MHz if you live in North America.
- You can see the list of supported models here.
Perhaps there are other compatible phones, in particular, Motorola c113 and c113a are fully compatible with OsmocomBB, although they are not represented on the official website.
SIM cards are not needed.
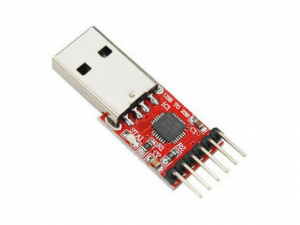
USB-TTL converters can work on CP2102, FT232 or PL2303 chips.
We recommend using CP2102 because using a specialized utility you can make this converter work at non-standard speeds, which is required for some branches of OsmocomBB.
- You can buy it for 10 dollars on eBay, or 2-3 times more expensive in more or less large radio electronics stores. The second option is preferable if you do not want to wait.
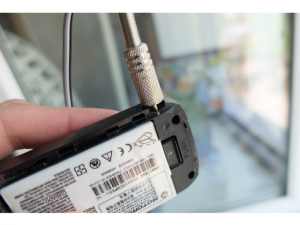
- The wire that connects the computer to the phone may look different, but I recommend buying a 2.5 mm jack in the radio parts store
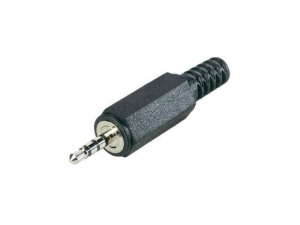
- And wires with jumpers, such as those that are often used for Arduino or Raspberry Pi.

In the absence of the second, you can invent something of your own. Your task is to connect the Tx, Rx, GND outputs of the converter to the jack contacts as follows:
- TxD connect to the tip of the jack
- RxD connect to the middle jack contact
- Connect GND to the bottom of the jack.
You can take a bundle of 3 wires, bite off a jumper from one end and solder the remaining wires with jumpers at one end to the jack’s terminals.
Note that for starting a network with support for voice calls you need 2 phones, 2 converters, and 2 ready wires.
Unclear problem
- After purchasing a jack, make sure that it can be inserted into the headset jack on the end. Otherwise, you may receive errors due to an unreliable connection to the phone or not at all.
- Jacks, which are most often sold in the shops of radio components, are not inserted into the socket until the end. They are hindered by the body (of their own phone).
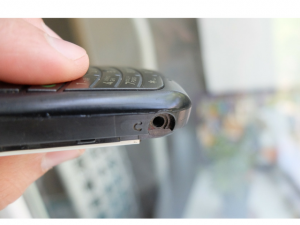
- To make sure that the jack comes through, you can get the phone out of the case and try to insert the jack.
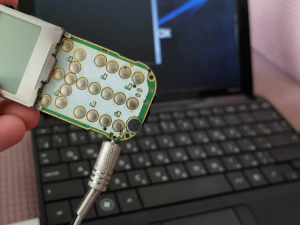
If you realized later that the case interferes with the jack, you will need to arm yourself with pliers and files, turn on the wits and change the case of the jack or phone so that the contact is reliable.
- You can check the reliability of the connection using PuTTY. You can find out the COM port number by looking in the Device Manager.
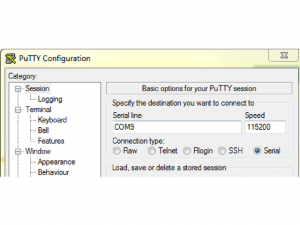
- Connect the phone to the computer via the USB-TTL converter and the assembled wire, briefly press the power button and in the PuTTY window, the @ftmtoolerror message should appear among other symbols.
The same can be done under Linux with minicom.
Installation
- As mentioned in the beginning, we recommend using Ubuntu 14.04, which is the 32-bit version. Perhaps you can install everything on 64-bit Ubuntu 16.04, but then you will have to solve all the problems with the dependencies when installing and compatibility with the Osmocom project branches.
- Also, you can try to use a virtual machine, but we never managed to get a stable connection on the guest OS. Probably, problems arise at the level of USB port virtualization.
- You can use a virtual machine to work with Osmo Cobb and its individual applications, but if it concerns the launch of a GSM network, I advise you not to use virtualization.
Install the basic packages that we need to build Osmocom.
apt-get install build-essential libtool libtalloc-dev shtool autoconf automake git-core pkg-config make gcc libpcsclite-dev
Installing the lib Osmo core library
git clone git://git.osmocom.org/libosmocore.git
cd libosmocore/
autoreconf -i
./configure
make
make install
ldconfig -i
Install the toolchain
To build programs for the phone, we need a cross-toolchain compiler. The official website now presents a newer version, but with it will not work the old Osmo cobb branches that were written under the old compiler.
Of course, you can slightly fix the code and fix the errors that occur when compiling with the new toolchain, but I leave it outside the scope of this article and I recommend using the following script to install the cross-compiler.
git clone https://github.com/axilirator/gnu-arm-installer.git
cd gnu-arm-installer
apt-get install libgmp3-dev libmpfr-dev libx11-6 libx11-dev flex bison libncurses5 libncurses5-dbg libncurses5-dev libncursesw5 libncursesw5-dbg libncursesw5-dev zlibc zlib1g-dev libmpfr4 libmpc-dev texinfo
./download.sh
./build.sh
The process can take a long time, up to several hours. Be patient and make sure that the file system is free at least 3 GB.
After the compilation is completed, add the path to the executable files in PATH, in my case/root/cosmo com/gnu-arm-installer/install/bin
vi /etc/bash.bashrc
add in the end
export PATH=$PATH:/root/osmocom/gnu-arm-installer/install/bin
Collecting Osmo cobb
The master branch takes part in launching the GSM network, but it will be useful if you want to work with other applications, such as RSSI or cell_log (see further in the text).
If you want to be able to send anything to the network, you need to uncomment the src/target/firmware/Makefile line:
CFLAGS += -DCONFIG_TX_ENABLE
Assemble
git clone git://git.osmocom.org/osmocom-bb.git osmocombb
cd osmocombb/src
make
Installing the FFT package
wget http://www.fftw.org/fftw-3.3.6-pl2.tar.gz
tar -xvzf fftw-3.3.6-pl2.tar.gz
cd fftw-3.3.6-pl2
./configure --enable-threads --enable-float
make
make install
ldconfig
Installing the lib Osmo-DSP library
git clone git://git.osmocom.org/libosmo-dsp.git
cd libosmo-dsp/
autoreconf -i
./configure
make
make install
ldconfig
Assembling the Osmo comb B branch for OsmoBTS
git clone git://git.osmocom.org/osmocom-bb.git trx
cd trx/
git checkout jolly/testing
cd src/
You need to uncomment the target/firmware/Makefile line:
CFLAGS += -DCONFIG_TX_ENABLE
Compile:
make HOST_layer23_CONFARGS=--enable-transceiver
Install libdbi for SQLite
apt-get install sqlite3 libsqlite3-dev libsctp-dev
Download: sourceforge.net/projects/libdbi/files/libdbi/libdbi-0.8.3
tar -xvzf libdbi-0.8.3.tar.gz
cd libdbi-0.8.3
autogen.sh
./configure --disable-docs
make
make install
ldconfig
cd ..
Download: sourceforge.net/projects/libdbi-drivers/files/libdbi-drivers/libdbi-drivers-0.8.3
tar -xvzf libdbi-drivers-0.8.3.tar.gz
cd libdbi-drivers-0.8.3
There is a typo in the driver that causes errors during connection to the HLR. We correct it before compilation.
vi drivers/sqlite3/dbd_sqlite3.c
Change _dbi_internal_error_handler to _dbd_internal_error_handler.
Collect:
./autogen.sh
./configure --disable-docs --with-sqlite3 --with-sqlite3-dir=/usr/bin --with-dbi-incdir=/usr/local/include
make
make install
ldconfig
Installing ORTP
wget http://download.savannah.gnu.org/releases/linphone/ortp/sources/ortp-0.22.0.tar.gz
tar -xvf ortp-0.22.0.tar.gz
cd ortp-0.22.0/
./autogen.sh
./configure
make
make install
ldconfig
Installing the libosmo-abis library
git clone git://git.osmocom.org/libosmo-abis.git
cd libosmo-abis
autoreconf -i
./configure
make
make install
ldconfig
Installing the libosmo-natif library
git clone git://git.osmocom.org/libosmo-netif.git
cd libosmo-netif
autoreconf -i
./configure
make
make install
ldconfig
Installing OpenBSC
apt-get install libssl0.9.8 libssl-dev
ldconfig
git clone git://git.osmocom.org/openbsc.git
cd openbsc/openbsc/
autoreconf -i
./configure
make
make install
Installing OsmoBTS
git clone git://git.osmocom.org/osmo-bts.git
cd osmo-bts
autoreconf -i
./configure --enable-trx
make
make install
Configuration
We are working with Osmocom from under root, so my configuration files are in /root/.osmocom
mkdir /root/.osmocom;cd /root/.osmocom
touch ~/.osmocom/osmo-bts.cfg
touch ~/.osmocom/open-bsc.cfg
Then there are two options:
- Download OsmoNTIB manuals and customize everything yourself
- Instead of empty files, use my own, modified to suit your needs.
Our configuration files osmo-btf.cfg and open-bsc.cfg are at the end of the article.
- We deliberately removed the band for the GSM band and ARFCN from the files.
ARFCN is the radio channel on which your base station will operate.
A suitable ARFCN can be found using the RSSI program, the Osmo comb B package, or using the cell_log tool.
Remember that the signal from your base station should not interfere with the signals of commercial GSM networks. Depending on which channel you use, select band.
In order to securely limit the signal from your base station, you can build a Faraday Cage.
Without adding ARFCN and band to our configuration files, OsmoNTIB will not start.
Launching
We connect both phones to the computer and check their availability.
ls -l /dev/ttyUSB*
You should see ttyUSB0 and ttyUSB1.
Next, each command must be executed in a separate terminal.
In the Osmocon syntax, you can have differences. For example, in your case, there may be compal_e86 or e87 and not c123xor, but something else.
Initialize the first transceiver
cd /root/osmocom/trx/src
host/osmocon/osmocon -m c123xor -p /dev/ttyUSB0 -s /tmp/osmocom_l2 -c target/firmware/board/compal_e88/trx.highram.bin -r 99
Press the power button of the phone that was connected first. After the download is complete, you will see TRX on the phone screen.
Initialize the second transceiver
cd /root/osmocom/trx/src
host/osmocon/osmocon -m c123xor -p /dev/ttyUSB1 -s /tmp/osmocom_l2.2 -c target/firmware/board/compal_e88/trx.highram.bin -r 99
Press the power button of the phone, which was connected by the second. After the download is complete, you will see TRX on the phone screen.
Set up transceivers to follow the timer of commercial BTS
cd /root/osmocom/trx/src/host/layer23/src/transceiver/
./transceiver -a ARFCN -2 -r 99
Instead of ARFCN, you must specify the channel number on which the commercial base station operates with a good signal. Again, can be found using RSSI or cell_log.
Launch MSC, HLR and SMS Center
cd /root/.osmocom
osmo-nitb -c ~/.osmocom/open-bsc.cfg -l ~/.osmocom/hlr.sqlite3 -P -C --debug=DRLL:DCC:DMM:DRR:DRSL:DNM
We start the base station
cd /root/.osmocom
osmo-bts-trx --debug DRSL:DOML:DLAPDM -r 99
All components of GSM network should now be in working order and you are ready to become the first subscriber!
Testing
- Now you can connect to the network from any cell phone by selecting it in manual mode. The network is displayed as 00101 or TestNet. The network may not be on the first try.
If something went wrong during the connection, turn on the air mode, turn it off and try again to connect to the network.
- After connecting, you can find your number using USSD code * # 100 #.
You can connect to the OsmoNTIB console in this way:
telnet localhost 4242
Connect to the OsmoBTS console as follows:
telnet localhost 4241
That’s all. In the next article, We’ll show you how to investigate the traffic of mobile devices using the Wireshark sniffer.
Good luck!
Configuration files:


