Tips And Tricks On How To Work In Console Quickly And Efficiently
On the Internet, you can find a lot of tips on how to work effectively in the console. In most of these articles, the authors talk about the banality of the type “learn hot keys” or “sudo !! run the last command under sudo”. We will tell you what to do when you have already learned the hotkeys and know about sudo.
The terminal should start instantly
How much time do you need to start the terminal? And one more? For a long time, our terminal was launched with the Ctrl + Alt + T combination and we thought it was fast. But when we moved from Openbox to i3, we started to run the terminal through Win + Enter, this combination was in the default config. And you know what? we no longer believe that Ctrl + Alt + T is fast.
Of course, the joke is not in winnings of milliseconds, but in the fact that you open the terminal at the level of reflexes, completely ignoring this.
If you often work in the terminal, but to launch it, reach for the mouse, then try setting up a convenient hotkey. We sure you will like it.
Zsh instead of bash
We know the Zsh should be set up for at least three features: advanced autocomplete, typo correction, and multiple pathname competition: when one Tab turns /u/s/d into /usr/share/doc. Arch Linux has long been migrated to zsh on its installation disc. We hope that one-day zsh will become the default shell in Ubuntu. It will be a historic moment.
Starting to use zsh is generally not difficult. Install it through the package manager and get some ready-made config. We recommend the config used in Arch Linux:
wget -O ~/.zshrc https://git.grml.org/f/grml-etc-core/etc/zsh/zshrc
It remains only to change the default shell to zsh and re-login.
chsh -s $(which zsh)
Everything, continue to work as if nothing happened.
What should be the shell prompt
Shell prompt (command line prompt) – this is the small text that is displayed in the terminal in front of your command. It needs to be customized to your character work. Think of it as a car dashboard. Put their useful information, let it help you navigate. Make it comfortable, especially if you see it every day!
- Shell prompt should display the current shell directory. If the current directory is not displayed in the shell prompt, you will have to keep it in your head and periodically check with the pwd command. Do not do it this way. Keep more important things in mind and do not waste time on the pwd command.
If you periodically switch from your user to root, you need an indication of the current user. Often it is important not a specific username, but its status (normal or root). The easiest way to do this is with color: a red shell prompt at the root, green in its user. So you would never confuse the root shell with the usual one.
- If you connect to servers via ssh, then you need to somehow distinguish your local shell from the server shell. For this, the shell prompt should contain the hostname, and even better – the ssh connection indicator.
Shell prompt can show the return code of the last command. Let me remind you that the zero return code means that the command completed successfully, non-zero – the command ended unsuccessfully. The return code of the last command can be found with the echo $? Command, but typing it all on the keyboard takes too long. Let the shell prompt be better if the command failed.
If you are working with git-repositories, it will be useful to display the status of the repository in the shell prompt: the current branch and the status of the working directory. So you will save time on the git status and git branch commands and can’t go wrong with the commit.
Someone adds a clock or virtual terminal name (tty), or some arbitrary squiggles to their shell prompt. This is all superfluous. It is better to leave more space for teams.
Our shell prompt under different conditions looks like this:
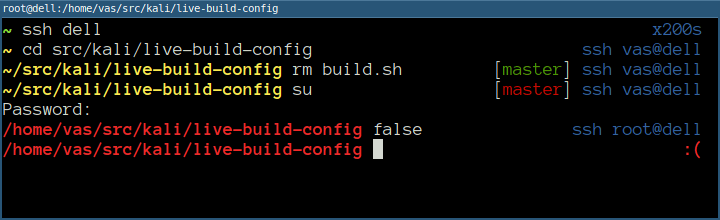
The screenshot shows that the title bar of the terminal window performs a similar task. This is also a dashboard piece and can also be customized.
How to implement all this in your .zshrc? The PROMPT variable is responsible for the left prompt, RPROMPT is for the right one. The EUID variable will help determine the status of a user (normal or root), and the presence of an ssh connection, SSH_CLIENT or SSH2_CLIENT. We get this workpiece:
if [[ -n "$SSH_CLIENT" || -n "$SSH2_CLIENT" ]]; then
if [[ $EUID == 0 ]]; then
PROMPT=...
else
PROMPT=...
fi

else # not SSH
if [[ $EUID == 0 ]]; then
PROMPT=...
else
PROMPT=...
fi
fi
We deliberately do not indicate the code ready for copy-paste, because the concrete implementation is a matter of taste. If you do not want to bother and our screenshot does not cause you disgust, you can take the config from the GitHub.
Summary:
- The required minimum is the current directory.
- Route shell should be clearly visible.
- The username does not carry a payload if you always sit under one user.
- The hostname is useful if you connect to servers over SSH. Not required if you always work on the same machine.
- Unsuccessful completion of the last command is useful to see immediately.
- The status of the git repository saves time on the git status and git branch commands and is an additional protection against a fool.
Active use of command history
Most of the teams in your life you enter more than once, which means it would be convenient to pull them out of history instead of typing again. All modern shells can memorize command history and provide several ways to search through this history.
Perhaps you already know how to delve into the history of the combination of Ctrl + R. It has two significant drawbacks:
- To start a search, the input field must be empty. Those. in the case of “I started typing a command – we remembered about the search” I’d have to erase what I’ve started, press Ctrl + R and repeat the input. It is too long.
The search “forward” by default does not work, because Ctrl + S stops the terminal.
How the fastest and most convenient search works:
- You start typing a command,
- You remember the search,
- You press the hotkey and the shell offers commands from the history that started in the same way.
For example, you want to synchronize a local directory with a remote one using rsync. You already did this a couple of hours ago and want to get the team out of the story. You type rsync, press a combination once or twice, and now the cherished team is ready to launch. You do not need to turn on the history search mode beforehand, the shell prompt does not change to (reverse-i-search) ‘:, nothing jumps anywhere. You just go through the teams from the history. Just as with the arrows ↑ ↓ you go through the previously entered commands, only with a filter at the beginning of the command. It is damn convenient and saves a lot of time.
In Fish and iPython shells such a search is already assigned to arrows. We think that many people switched to fish just for the sake of this behavior of arrows.
In Bash and zsh, by default, this search does not work, it must be turned on by hand. We configured PgUp to search backward and PgDown to search forward. Far to reach them, but I’m used to it. Perhaps in the future, we will reassign to something closer, for example, Ctrl + P and Ctrl + N.
For bash, add a couple of lines to /etc/inputrc or ~ /.inputrc:
"\e[5~": history-search-backward
"\e[6~": history-search-forward
If you have taken a ready zshrc, then there the search is most likely already assigned to PgUp and PgDown. If not, add to ~ /.zshrc
bindkey "^[[5~" history-beginning-search-backward # pg up
bindkey "^[[6~" history-beginning-search-forward # pg down
Curiously, over time, we began to write teams at the rate that we will later raise them from history. Here are a few tricks:
Combining commands that are always executed one after another.
ip link set eth1 up && dhclient eth1
mkdir /tmp/t && mount /dev/sdb1 /tmp/t
Absolute paths instead of relative ones allow you to run a command from any directory:
vim ~ /.ssh/config instead of vim .ssh/config, systemd-nspawn /home/chroot/stretch instead of systemd-nspawn stretch, etc.
Wildcard substitution makes teams more versatile. We usually use it with chmod and chown.
chown root:root /var/www/*.sq && chmod 644 /var/www/*.sq
Hotkeys
We will list the required minimum.
Alt +. – substitutes the last argument of the previous command. You can also type a sequence! $.
Ctrl + A, Ctrl + E – you have to go to the beginning and end of the edited command, respectively.
Ctrl + U, Ctrl + Y – cut everything to the clipboard, paste from the buffer. Rescues when you type a complex command, and then you realize that you need to do another before it. Where would you hide the current input? Here and hide.
Ctrl + W – erase one word to the left of the cursor. If you hold and hold, quickly clears the command line. By default, the text is not deleted but placed in the buffer (which for Ctrl + Y).
Ctrl + K – deletes from the cursor to the end of the line. Ctrl + A, Ctrl + K quickly clears the command line.
PgUp, PgDown, Ctrl + R – search by history.
Ctrl + L – clear the terminal.
Keyboard responsiveness
We will tell you about a small setting that allows you to scroll faster, move through the text or erase. What do we do when we want to erase something long? Hold Backspace and watch the cursor run backward, taking the extra letters. What happens when this happens? When you press Backspace, one character is erased, then there is a slight delay, then auto-repeat is triggered: Backspace removes characters one by one as if they are constantly tapping on it.
We recommend adjusting the delay and frequency of auto-repeat to the speed of your fingers. The delay before the auto-repeat is triggered is needed when you want to delete only one character – it gives you time to release the key. The too long delay makes auto-wait waiting. Not long enough to annoy, but enough to slow down the transfer of thoughts from the head to the computer. The higher the repetition rate, the faster the text is erased, and the more difficult it is to stop this process in time. The essence of the setting is to find the golden mean.
So, the magic command:
xset r rate 190 20
190 – delay time in milliseconds,
20 – frequency in a number of repetitions per second.
We recommend starting with these values and gradually reducing the delay until the occurrence of false positives, then a little bit back. If you set a very short delay, then the keyboard will become impossible to use. You have to restart the X server or the entire computer. So be careful.
To save the settings, add this command somewhere in the X autostart.
Process completion indicator
We often have to run long processes: some fat backup, copying over the network, unpacking/packing archives, building packages, etc. We usually start such a process, switch to another task and periodically glance whether our long process has completed. It happens that we immerse us in work and forget about it. The solution is to add a process completion notification that will lead me out of a trance.
You can use different tools for this: notify-send, dzen2, beep, aplay. All of them are good in their own way but do not work on ssh. Therefore, we use the terminal beep:
long-running-command; echo $'\a'
In ASCII, there is a 0x7 character called bell. It is designed to beep PC-speaker. The PC speaker is incompatible, it is not everywhere, and it is not heard in the headphones. Therefore, some terminals use the so-called visual bell. We use urxvt, and it does a visual bell by turning on the urgency flag. This is when the window informs you that it needs attention.
You can check now how your terminal responds to the bell symbol:
sleep 3; echo $'\a'
Three seconds is given so that you can switch to another window, otherwise, it may not work.
Unfortunately, the visual bell through urgency is not in all terminals. We checked the most popular.
| Terminal | Visual Bell through urgency |
| konsoleI | Included in the settings |
| urxvt | Yes |
| xfce4-terminal | terminal is enabled in the settings |
| xterm | No |
| cool-retro-term | No |
| lxterminal | No |
| gnome-terminal | No |
Writing echo $ ‘\a’ for too long, so we did an alias wake.
Aliases
The cp, scp and rm commands must always work recursively. The argument -r is just a bad legacy! With cp, you can still find an excuse:
cp * foodir
Let’s copy only files to foodir, and with the -r switch it will think that you decided to copy foodir into yourself. But how often do you need this feature?
Rm and scp have no excuses, they are just boring! The situation is similar to the -p option of the mkdir command. So feel free to add to ~ /.zshrc
alias cp='cp -r'
alias scp='scp -r'
alias rm='rm -r'
alias mkdir='mkdir -p'
Wow, how we used to live without it! You can go even further and add -f to rm, but at your own risk. I’m still holding back.
You probably already use different variations of ls, because these are the most popular aliases.
alias ls='ls -F --color=auto'
alias la='ls -A --color=auto'
alias ll='ls -l --color=auto -h'
alias lla='ll -A --color=auto -h'
Well, color grep is much more pleasant than colorless:
alias grep='grep --colour=auto'
Do not forget that aliases do not work in scripts! There you must specify all the keys.


