
How to quickly setup auto-postings for Facebook and Twitter
Hello, dear readers!
The need to quickly and efficiently perform the work with the site is for everyone, both successful and novice entrepreneurs. The desire to automate the process is expressed not only in the easy filling of the site with content but also in the fastest informing the target audience about the appearance of new content.
In this article, We want to show you an easy way to post information (for example, articles or site pages) on social networks with minimal effort. Imagine that you are adding content to the site, or users of your site publish ads, and information about the addition of new content appears on your pages on social networks. This method is effective in that it delivers information directly to the target audience.
Auto-post on Facebook
I suggest starting with the practical part of this process. First, we’ll deal with autostarting on Facebook when adding an ad. According to the documentation for Facebook, we need to register the application to use it to post messages on the wall. We turn to the special page for developers:
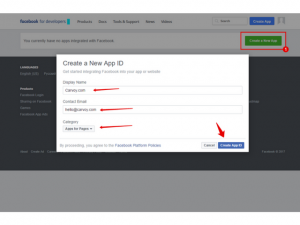
Here everything is very simple: we press the button “Create a New App”, enter information about your application (name, contact email, choose the category “Apps for Pages”), and, finally, after clicking on the button “Create App ID” and entering the test captcha An application is created.

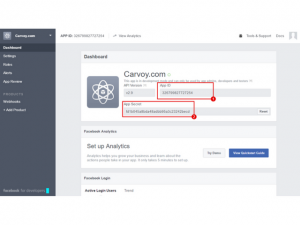
For further work you need the following parameters:
APP ID and APP SECRET
With this data, we need to get an access token for this application, which will allow us to act on behalf of the page administrator. This token will later be used for publication. How to get access token is described in detail in the facebook for developers documentation. All we need is to open the following link in the browser:
Https://graph.facebook.com/oauth/access_token?type=client_cred&client_id= <APP_ID> & client_secret = <APP_SECRET>
This request will return an access token that we can use for publication. Next, we set the permission to publish the following query:
Https://www.facebook.com/dialog/oauth?client_id=&client_secret=&redirect_uri=https://carvoy.com&scope=publish_actions&response_type=token
To publish on the wall of your social Facebook page, we will need to send an HTTP POST request to the following URL:
Https://graph.facebook.com/<PAGE_ID>/feed
Next, we need to provide a message, a link to the picture, a link to the page of the ad that you just added, the title, the description, without forgetting to send our access token parameter that we just received.
To find out the PAGE_ID of the page on the wall where you are going to publish the record, just change the full address of the www page to the graph and add the get access parameter to the parameter. Here, for example, a link to get the ID of the page I need.
Https://graph.facebook.com/Carvoy/?access_token=326799827727254?aRtZuU48IqeJ0s8SY6sVOIfPAiA
In response, we get the JSON object, which contains the ID of this page. Like this:
"name": "<g class="gr_ gr_707 gr-alert gr_spell gr_inline_cards gr_run_anim ContextualSpelling ins-del multiReplace" id="707" data-gr-id="707">Carvoy</g>",
"id": "1629966630552080"
}
Auto-hosting is implemented as an auto posting module, in which a class of behavior is created. I will use it in the Lease model and then handle the event when adding an advertisement (listing). Then this module can be re-used, supplemented and modified.
The structure of the module files:
…
autoposting
-- behaviors
-- -- AutopostingBehavior.php
-- Module.php
…
In the modules / autoposting / Module.php file, the module is initialized. And in the modules / autoposting / behaviors / AutopostingBehavior.php file – a description of the behavior when adding a new entry:
<?php

namespace modules\autoposting\behaviors;

use Yii;
use yii\base\Behavior;
use yii\base\Exception;
use yii\db\ActiveRecord;
use yii\helpers\Url;
use Abraham\TwitterOAuth\TwitterOAuth;

/**
* Class AutopostingBehavior
* @package modules\autoposting\behaviors
*/
class AutopostingBehavior extends Behavior {

/**
* @return array
*/
public function events() {

return [
ActiveRecord::EVENT_AFTER_INSERT => 'postToWall',
];
}

/**
* @param \yii\base\Event $event
*
* @throws Exception
*/
public function postToWall( $event ) {

$model = $event->sender;

if ($model) {
$link = Url::to(['/lease/lease/view', 'state'=>$model->state, 'node'=>$model->url ], true);
$message = "New listing available on our site - $model->make $model->model $model->year in $model->location. \n" . $link;
$this->facebookPost([
'message' => $message,
'link' => $link,
// 'picture' => 'http://thepicturetoinclude.jpg', // link to vehicle picture
// 'name' => 'Name of the picture, shown just above it',
// 'description' => 'Full description explaining whether the header or the picture'
]);
$this->twitterPost($message);
}

}

private function facebookPost ($data)
{
// need token
$data['access_token'] = '326799827727254|aRtZuU48IqeJ0s8SY6sVOIfPAiA';

$page_id = ‘1629966630552080’;
$post_url = 'https://graph.facebook.com/'.$page_id.'/feed';

// init
$ch = curl_init();
curl_setopt($ch, CURLOPT_URL, $post_url);
curl_setopt($ch, CURLOPT_POST, 1);
curl_setopt($ch, CURLOPT_POSTFIELDS, $data);
curl_setopt($ch, CURLOPT_RETURNTRANSFER, 1);
// execute and close
$return = curl_exec($ch);
curl_close($ch);
// end
return $return;
}

private function twitterPost ($message)
{

}

}
I will describe the twitterPost method a little later when we finish with the publication in Facebook and go to auto reposting on Twitter.
Let’s add a class of auto posting behavior to an array with model behaviors
/modules/lease/models/frontend/Lease.php
...
/**
* @inheritdoc
*/
public function behaviors()
{
return [
'timestampBehavior' => [
'class' => yii\behaviors\TimestampBehavior::className(),
],
\modules\autoposting\behaviors\AutopostingBehavior::className(), // Autoposting behavior
];
}
...
Immediately add the behavior of TimestampBehavior. With its help, the created_at or updated_at model fields are populated during the creation or update of the record. Now when creating a new listing in the AutopostingBehavior class, the postToWall method will work, in which requests for publication to social networks will be sent. This is defined by the following line in the AutopostingBehavior class:
...
ActiveRecord::EVENT_AFTER_INSERT => 'postToWall',
...
Auto-post on Twitter
For posting on Twitter we will use the most popular PHP library for working with Twitter OAuth REST API – twitter auth.
Install it using composer. We just need to run the following command:
php composer.phar require abraham / twitter auth
To use the Twitter API, you also need to register your application. To do this, go to the link https://apps.twitter.com/ under your login and password and click on the button “Create New App”. Then fill out the form and click “Create your Twitter application”.
We get into the settings of the newly created application. Here you need to make sure that the item “Access level” is selected “Read and write”.
Go to the “Keys and Access Tokens” tab, and then click on the name of the newly created application. On this tab, we take 4 keys to work with our application:
Consumer Key
Consumer Secret
Scroll down the page and see the button “Create my access token”; After clicking on it get the missing key pair:
Access Token
Access Token Secret
The next steps are very simple. We implement the twitterPost method. To do this, you need to use the TwitterOAuth class with the keys to access Twitter.
...
private function twitterPost ($message)
{

$CONSUMER_KEY = 'XYNpO5yj0shMgH43j4lYKMDfH';
$CONSUMER_SECRET = 'VevyEwrhHxabcQgN2S0KuL1i9Gx9CnPXyM2yVLfQ0LlJSZ7BmF';
$OAUTH_TOKEN = '3432829204-6IS6o3hGW3xouvgCso279o4ODU15grLLUy0iWPX';
$OAUTH_SECRET = 'vGzYOtJkcx8PK96YcyUdXM6PtqmhGiVLmHOqCDHM2lkIq';
$connection = new \Abraham\TwitterOAuth\TwitterOAuth($CONSUMER_KEY, $CONSUMER_SECRET, $OAUTH_TOKEN, $OAUTH_SECRET);

$statues = $connection->post("statuses/update", array("status" => $message));

return $connection->getLastHttpCode() == 200;

}
...
So, in just a few steps we organized an auto-posting to two popular social networks. Naturally, the integration code is presented for informational purposes for demonstration; It can be improved and integrated with each social network into a separate class.
Parameters such as access_token and page_id for Facebook, as well as the Consumer Key, Consumer Secret, Access Token, Access Token Secret for Twitter, can be placed in the application configuration file in the file common \ config \ params.php.
<?php
return [
'adminEmail' => 'admin@example.com',
'supportEmail' => 'support@example.com',
'user.passwordResetTokenExpire' => 3600,
'autoposting' => [
'twitter' => [
'consumer_key' => "XYNpO5yj0shMgH43j4lYKMDfH",
'consumer_secret' => "VevyEwrhHxabcQgN2S0KuL1i9Gx9CnPXyM2yVLfQ0LlJSZ7BmF",
'oauth_token' => "3432829204-6IS6o3hGW3xouvgCso279o4ODU15grLLUy0iWPX",
'oauth_secret' => "vGzYOtJkcx8PK96YcyUdXM6PtqmhGiVLmHOqCDHM2lkIq",
],
'facebook' => [
'page_id' => '1629966630552080',
'page_access_token' => '326799827727254|aRtZuU48IqeJ0s8SY6sVOIfPAiA'
]
]
];
Now you can access these parameters through the params property of the application instance:
$ Data [‘access_token’] = Yii :: $ app-> params [‘autoposting‘] [‘facebook’] [‘page_access_token’];
I will note separately that on the working project it is necessary to organize a queue for sending requests to social networks, and not to make synchronous requests for publication. This is due to the fact that the user when publishing an advertisement on the site with this approach, will wait for the execution of requests for publication in social networks and only after they have been implemented will receive a feedback about the successful addition of his ad to the site. This can take a long time, although the moment of publication in social networks should not adversely affect usability.
To organize this kind of queue, so that the publication in social networks passed in the background and did not increase the time for the user to add the ad to the site, the best, in my opinion, the extension for the organization of queues will help us. https://github.com/zhuravljov/yii2- Queue
