Neural Network – Your Own Image Recognition In 5 Mins
Hello everyone, in this article, we want to show how you can implement the Hopfield network for pattern recognition.
I myself, like many in one day, decided to take interest in software training, AI and neural networks. Fortunately, there are a lot of parsing and examples on the network, but all of them operate with an abundance of function formulas and if you are not good in math, then it will be a bit hard to follow up, but I will try to demonstrate a simple example of a Hopfield network by using GO language.
Mathematical description of the network – Hopfield Network
Why the Hopfield network?
A fairly quick and less understandable example if one can operate with such terms as simple and understandable in the world of AI.
In this example, we will try to recognize images from a black and white picture of 20×20 pixels.
Let’s try to understand the steps that we have to fulfill before we get our desired result:
- Convert image to vector
- Convert vectors to matrices
- Summarize the matrices and obtain one single matrix (W)
- Reset the uniform matrix diagonally
- Multiply the matrix W by the vector of the incoming image
- Skip the resulting vector through the activation function for this network (F)
- Substitute the new vector for step 5 and continue the operation until we get a steady state of the network (we will get the same vector at the output).
Let’s pass to the code with the detailed description. All the libraries we need:
package main

import (
"github.com/oelmekki/matrix"
"fmt"
"os"
"log"
"image"
"math"
"image/color"
"image/png"
_ "image/jpeg"
)
Create an array of vectors from 3 elements (the number of samples), convert the images into vectors and add the samples to the array. The ‘Y’ vector is the image that we want to recognize.
vectorArrays := [3][]float64{}

x1 := getVectorFromImage("Images/А.jpg")
x2 := getVectorFromImage("Images/Б.jpg")
x3 := getVectorFromImage("Images/О.jpg")

y := getVectorFromImage("Images/Income.jpg")

// Add images to the array
vectorArrays[0] = x1
vectorArrays[1] = x2
vectorArrays[2] = x3
Create an array of matrices, convert all the vectors into matrices and add them to the matrix array. Create a blank of the matrix W and begin the summation of all the matrices, put the result in B.
matrixArray := [len(vectorArrays)]matrix.Matrix{}

for i, vInArray := range vectorArrays {

matrixArray[i] = vectorToMatrix(vInArray, vInArray)
}

W := matrix.Matrix{}

for i, matrixInArray := range matrixArray {
if i == 0 {
W = matrixInArray
continue
}
W, _ = W.Add(matrixInArray)
}
We zero the matrix diagonally.
for i := 0; i < W.Rows(); i++ {
W.SetAt(i, i, 0)
}
Create the output of the output vector, multiply the matrix by the Y vector, put the result into the vector S and substitute it back into the multiplication.
S := make([]float64, 400)

for II := 0; II < 100; II++ {
if II == 0 {
S, _ = W.VectorMultiply(y)
for i, element := range S {

// Activation Func "sigmod"
S[i] = sigmod(element)
}
continue

} else {

S, _ = W.VectorMultiply(S)
for i, element := range S {

// Activation Func "sigmod"
S[i] = sigmod( element)
}
}

}
More about the sigmod () function
This is the activation function F and the principle of its operation (in our example) is to convert the data in the output vector and bring them either to 1 or to -1.
Since we are working with a bipolar network, then the data can be only 1 and -1.
- The image should be brought from RGB to 1 and -1, where the sum of all points divided by 3 (the conditional brightness of the pixel) should tend to black or white. Since R = 255, G = 255, B = 255 it is white, and R = 0, G = 0, B = 0 is black. I chose a threshold of 150, so that more or equal to 150 will be white (1) all that is less than black (-1), where the choice between black in -1 and white in 1 can be arbitrary, all we need is a black and white by the values. White can be the same -1, and black 1, in this case, it does not matter. It’s also worth considering that we are working with a symmetrical matrix and the images should be equilateral.
In order to convert the image into a vector, we need to represent the image as a matrix that we cut horizontally and each cut layer (and we have 20) is added to the end of the previous layer and we get a vector of 400 (20×20) in length.
In the example, I do not check the output vector for stability, but I simply go through the loop 100 times, and at the end, I check which of the samples looks like our result. The network either guessed or not at the same time giving out a so-called chimera or a free interpretation of what she could see. This is the result I save in the image.
Since we use the synchronous mode of the Hopfield network, the result will be weak. Of course, you can use asynchronous, which will take more time and resources, but the result will be much better.
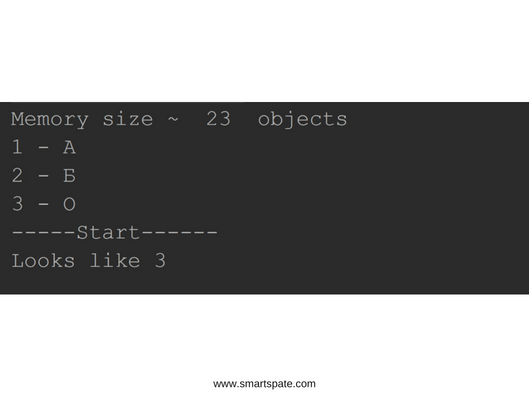
Example of work:
- <- Input image

The answer is:
