How to Write The Drivers For GPIO, UART On Rust
This part is devoted to improving the skills of working with Rust and writing a couple of useful utilities and libraries. Let’s write the drivers for GPIO, UART, and built-in timer. We implement the XMODEM protocol. Using this all, we’ll write a simple shell and bootloader. Before reading this post, it is strongly recommended that you make sure that you have read this book. For lazy, but a little more experienced, we recommend this one.
Useful Materials
- Book v 2.0 by Rust. This book is definitely worth reading at least to those who have not read it.
- Documentation for the standard Rust library. There everything is ready, that is in the standard delivery.
- docs.rs – there you can read the documentation for various libraries.
- Linux Man Page online download for free without registration and SMS. RTFM!
- The wiki article on the XMODEM protocol. For general development and for those who are interested in the history of origin.
- More Documentation about XMODEM.
- BCM2837 – this is a processor of BROADCOM In the same place as last time.
Phase 0: Getting Started

Just in case, once again, make sure that you use the compatible software-hardware:
- A modern 64-bit Unix-like OS: Linux, macOS or BSD
- You have a suitable USB-connector (unauthorized can use attachments)
In addition, the following programs should be installed: git, wget, tar, screen, make and everything that was required for the zero level. For this part, you need to install socat.
Getting the code
You can declare the code for this part in this way:
git clone https://web.stanford.edu/class/cs140e/assignments/1-shell/skeleton.git 1-shell
Phase 1: Ferris Wheel

(You can completely skip this part if you already have enough knowledge of Rust.)
For the sake of training, we will edit the programs for Rust with some selfish goals. Some should be compiled after editing. Others should not be compiled. For the third, tests must be completed successfully.
In the depths of the Ferris-wheel/directory you can find the following:
- compile-fail – contains code that must be broken so that it does not compile
- compile-pass – contains the code, which must be fixed exactly to the compilation
- run-pass – contains the code with tests that should become green
- questions – on the idea for questions, but we have already agreed that you can put this all in the comments
There is also a script test.sh. This checks the accuracy of the tasks. If it is launched, it will popularly explain where and what is not quite as expected. Something like:
$ ./test.sh
ERROR: compile-pass/borrow-1.rs failed to compile!

ERROR: compile-pass/const.rs failed to compile!

...

0 passes, 25 failures
In addition, the script accepts the -v flag. If this flag is sent to the script, the errors that the compiler spits out will be shown:
$ ./test.sh -v
ERROR: compile-pass/borrow-1.rs failed to compile!
---------------------- stderr --------------------------
warning: unused variable: `z`
--> /.../ferris-wheel/compile-pass/borrow-1.rs:9:9
|
9 | let z = *y;
| ^
|
= note: #[warn(unused_variables)] on by default
= note: to avoid this warning, consider using `_z` instead

error[E0507]: cannot move out of borrowed content
--> /.../ferris-wheel/compile-pass/borrow-1.rs:9:13
|
9 | let z = *y;
| ^^
| |
| cannot move out of borrowed content
| help: consider using a reference instead: `&*y`

error: aborting due to previous error

...

0 passes, 25 failures
This script also takes a string as a filter. If it is available, only those paths to files ($ directory/$ filename) that match this filter will be checked. For example:
./test.sh trait
ERROR: compile-pass/trait-namespace.rs failed to compile!

ERROR: run-pass/trait-impl.rs failed to compile!

0 passes, 2 failures
One does not interfere with one another and you can combine the filter and the -v switch. Something like this: ./test.sh -v filter.
How much can you change?
Each file contains a comment that indicates how much it can spoil (diff budget). Those. the maximum number of changes that can be made to correct the program. Solutions that do not fit into this framework can be considered not passed.
For example. In the file compile-pass/try.rs there is such a comment:
// FIXME: Make me compile. Diff budget: 12 line additions and 2 characters.
It says that you can add no more than 12 lines of code (blank lines are also considered). And change (add/change/remove) 2 characters. You can use git diff to see the line changes. And git diff –word-diff-regex =. for the same, but symbol-by-symbol.
Another example:
// FIXME: Make me compile! Diff budget: 1 line.
It tells you that you can change (add/change/delete) only one code point.
General rules
After the changes, the supposed functionality of the programs should be preserved. Suppose, if the body of a function needs to be changed in such a way that it is compiled, it will not be enough to add unimplemented! (). If you are in doubt – try the best of what you can. Well, or ask in the comments.
In addition to this, it is not recommended at all to follow the following dirty methods:
- Change all these assert!
- Modify everything that is marked as “do not modify”
- Change comments on how much and what you can change
- Move, rename or add any files
When all tasks are executed test.sh will output 25 passes, 0 failures
Phase 2: Oxidation

At this stage, we’ll write a couple of libraries and one utility for the command line. We will work in the sub-directories stack-vec, volatile, ttywrite and xmodem. There will also be a number of questions, which can be answered, if not vlom. Each part is controlled by Cargo. At least these commands can be called useful:
- cargo build – build a program or library
- cargo test – launch of tests
- cargo run – launching the application
- cargo run – $ flags – this way you can pass flags when the application starts
About Cargo, there is a separate book: Cargo Book. From there you can get the necessary information about how it works in detail.
Subphase A: StackVec
One of the most important features that operating systems are dealing with is the management of memory allocation. When C, Rust, Java, Python, or, in fact, almost any application calls to malloc (), then when there is a shortage of memory, eventually a system call is used that asks the operating system for additional memory. The operating system determines whether there is still no memory available to anyone. If so, then from this memory OS will put the processor a little bit.
Structures like Vec, String and Box inside use malloc () to allocate memory for their own needs. This means that these structures require support from the operating system. In particular, they require that the OS can allocate memory. We have not even begun this part (see the next series), so we do not have any kind of memory management. Accordingly, all these Vec we can not (yet) use.
This is a concentrated mess because Vec is a good abstraction in every respect! This allows us to think in terms of .push () and .pop () without having to remember any subtleties. Can we get something similar to Vec without a full memory allocator?
- Of course. The first thing that comes to mind is a preliminary allocation of memory with the subsequent transfer of it into a certain structure that implements the necessary abstractions on top of it. We can allocate memory statically directly in a binary file, or somewhere on the stack. In both cases, such memory must have a fixed pre-known size.
In this sub-phase, we will implement the StackVec structure, which provides an api similar to the one provided by Vec from the standard library. But it uses a pre-allocated piece of memory. This StackVec is useful for us when implementing the command line (in phase 3). We will work in the stack-vec subdirectory. In this it is already possible to find the following things:
- Cargo.toml – configuration file for Cargo
- src/lib.rs – here we will append the necessary code
- src/tests.rs – tests that will be executed when the cargo test runs
- questions/ – billets for files with questions (we are not much interested)
StackVec interface
StackVec <T> is created by calling StackVec :: new (). As an argument for new, there is a T-type slice. The StackVec <T> type implements many methods that are used in much the same way as those from Vec. For example, take StackVec <u8>:
let mut storage = [0u8; 1024];
let mut vec = StackVec::new(&mut storage);

for i in 0..10 {
vec.push(i * i).expect("can push 1024 times");
}

for (i, v) in vec.iter().enumerate() {
assert_eq!(*v, (i * i) as u8);
}

let last_element = vec.pop().expect("has elements");
assert_eq!(last_element, 9 * 9);
The StackVec type is already declared in this form:
pub struct StackVec<'a, T: 'a> {
storage: &'a mut [T],
len: usize,
}
Understanding StackVec
There are a couple of questions about the StackVec device:
Why does push return Result? [push-fails]
The push method from Vec, which is from the standard library, does not have any return value. However, push from StackVec has: it returns a result indicating that there may be some error. Why can StackVec:: push () fail incorrectly, unlike Vec?
Why should we limit T to the time of life ‘a? [lifetime]
The compiler will reject the following StackVec declaration:
struct StackVec<'a, T> { buffer: &'a mut [T], len: usize }
If we add the constraint ‘a to type T, then everything will work:
struct StackVec<'a, T: 'a> { buffer: &'a mut [T], len: usize }
Why is this restriction required? What will happen if Rust does not follow this restriction?
Why does StackVec require T: Clone for the pop method? [clone-for-pop]
The pop method from Vec <T> of the standard library is implemented for any T, but the pop method for our StackVec is implemented only when T implements the Clone property. Why should this be so? What’s wrong with this restriction?
Implementing StackVec
Implement all unimplemented! () Methods from StackVec in the stack-vec/src/lib.rs file. Each method already has documentation (it is clear from it, what is required of you for example). In addition to this, there are tests in the src/tests.rs file that helps to ensure the correctness of your implementation. You can run the tests using the cargo test command. In addition, you need to implement the Deref, DerefMut, and IntoIterator trails for the StackVec class. And the IntoIterator trap for & StackVec. Without the implementation of these traits, the tests will not pass. Once you are sure that your implementation is correct and you are able to answer the proposed questions – go to the next subphase.
What tests require implementation of Deref? [deref-in-tests]
Read all the test code from the str/tests.rs file. What did tests not want to be compiled if there was no implementation of Deref? And what about DerefMut? Why?
In fact, the tests are not complete.
The proposed unit tests cover the basic functionality, but they do not check every sneeze. Look for such gaps and add more tests to the god of tests in the name of great justice.
Hint: the solution from the lifetime task of the zero phase can be useful.
Subphase B: volatile
In this part, we’ll talk about volatile-calls to memory and read the code in the volatile/ subdirectory. We will not write our code, but there are questions for self-testing.
Like the typical operating systems, compilers masterfully perform very tricky tricks. In the name of optimization, they do something that only looks like you conceived. In fact, there will be a very powerful witch inside. A good example of such a witchcraft is the removal of dead code. When the compiler can prove that the code has no effect on execution, the dead code is quickly and decisively sawn. Let’s say there is this code:
fn f() {
let mut x = 0;
let y = &mut x;
*y = 10;
}
The compiler can think a little and reasonably reason that * y after the record is never read. For this reason, the compiler can simply exclude this part from the resulting binary file. Continuing to argue in this vein, the compiler finds it suitable to drill the very declaration y and then x. In the end, the call f () will go under the knife.
Optimizations of this kind are very useful and valuable. Thanks to them, programs are accelerated without affecting the results. True in some cases, such fraud can have unforeseen consequences. For example, y will point to a register that is only writeable. In this case, the entry in * y will have quite observable effects without having to read * y. If the compiler does not know this, then this one will justify this part at the optimization stage and our program will not work as expected.
How can we convince the compiler that reading/writing something like this affects our cozy world by themselves? That’s exactly what is meant by volatile-calls to memory. The compiler is afraid not to optimize access to such areas.
Rusty volatile
In Rust, we can use the read_volatile and write_volatile methods to read and write raw pointers.
What kind of raw pointers are they?
Until now, we had a close look at the links (which are & T and & mutT). The raw pointers in Rust (* const T and * mutT) are the essence of the same links without tracking the lifetime of the borrow checker. Reading/writing using these raw indicators can lead to the same foot injuries that can often be observed in C and C ++ fans. Rust considers such operations unsafe. Correspondingly, all this must be marked with an unsafe-label. More information about raw indexes is in the documentation.
Write calls read_volatile and write_volatile every time is sad enough (besides that it can lead to annoying mistakes due to depression). For our happiness, Rust gives us the opportunity to make our life easier and safer. On the one hand, we can simply make a volatile wrapper (almost like the volatile keyword in the cue) and ensure that every read/write will remain in our code. Bonus we can define a wrapper only for reading or only for writing.
Introduction to Volatile, ReadVolatile, WriteVolatile, and UniqueVolatile
The volatile in the volatile/ directory (who would have thought?) Implements these four types that do roughly what is obvious from their name. More details can be found in the documentation. Call cargo doc –open directly in the volatile/ directory to actually read this very documentation in a convenient way.
Why is UniqueVolatile here? [unique-volatile]
Both Volatile and UniqueVolatile allow you to work with volatile-calls to memory. Based on the documentation, what is the difference between the two types?
Open the src/ lib.rs code. Read the code in the moo own skills. After that (reading the code), answer the following pair of questions. As you finish, you can move on to the next subphase.
How is the restriction on reading and writing organized? [enforcing]
The ReadVolatile and WriteVolatile types make it impossible to read and write the pointer, respectively. In what way is this done?
What is the advantage of using traits instead of the usual methods? [traits]
On closer examination, you can change that each type implements only one new method of its own. All other methods are related to Readable, Writeable and ReadableWriteable implementations in one way or another. What is the profit from this? Describe at least two advantages of this approach.
Why is read and write safe, and new is not safe? [safety]
What should be true in relation to new so that read and write can be considered safe? It would be safe to mark new instead as safe, and read and write opposite unsafe?
Tip: Read the documentation for all of these methods.
Why do we force to use new? [pub-constructor]
If the Volatile type were declared as follows:
struct Volatile<T>(pub *mut T);
then a value of type Volatile could be created using Volatile (ptr) instead of calling new. What is the use of the fact that we create our wrapper with the static call new?
Tip: consider the implications on security statements for both options.
What do macros do? [macros]
What do macros readable! writeable! and readable_writeable !?
Subphase C: xmodem
In this sub-phase, we implement the XMODEM file transfer protocol (the xmodem/ subdirectory). The main work is in the xmodem/src/lib.rs file.
XMODEM is a simple protocol for file transfer, developed in 1977. It has packet checksums, cancellation of the transfer, and the ability to automatically replay the transmission when errors occur. It is widely used to transmit information through serial interfaces such as UART.
Protocol
The protocol itself is described in sufficient detail in the text file Understanding The X-Modem File Transfer Protocol. We repeat something of the description right here.
Do not base your implementation on the explanation from Wikipedia!
Although the explanation from the pedagogic will be useful at a high level, many details will differ from what we will implement here. Use pedagogy only as an overview of the protocol.
XMODEM is quite a binary protocol: raw bytes are received and sent. In addition, the protocol is half-duplex: at any given time, the sender or receiver sends data, but never both at once. Finally, this is a batch protocol: data is divided into blocks (packets) of 128 bytes. The protocol determines which batiks to send when to send them, what they will designate, and how to read them later.
To begin with, we define several constants:
const SOH: u8 = 0x01;
const EOT: u8 = 0x04;
const ACK: u8 = 0x06;
const NAK: u8 = 0x15;
const CAN: u8 = 0x18;
To start the transmission, the receiver sends a NAK byte, and the sender of the same NAK at the same time expects. After the sender receives a NAK byte, it can start transmitting packets. The receiver sends NAK only to start transmission, but not every time for each packet.
After the transfer started, the reception and transmission of the packets are identical. Packets are numbered sequentially starting with 1. When the size of one byte exhausts itself (that is, after 255), then start counting from 0.
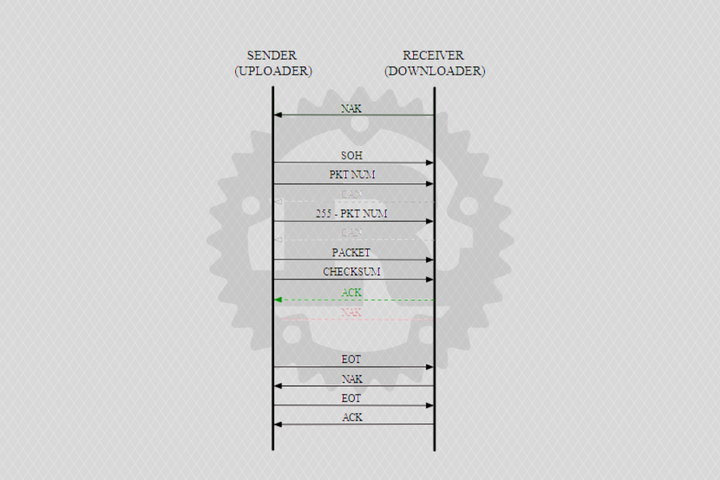
To send a packet, the sender:
- Sends SOH byte
- Sends the package number
- Sends the inverse value of the packet number (255 – $ package_number)
- Sends the package itself
- Sends the checksum of the package
The checksum is the sum of all bytes modulo 256 - Waiting for one byte from the host:
If this is a NAK byte, then we try to send the packet again (up to 10 times)
If it is an ACK byte, then you can send the following packet
At the same time, to receive the packet, the sender performs the opposite task:
- Waits for the sender byte SOH byte or byte EOT
If another byte is received, the receiver cancels the transmission
If an EOT byte is received, the transmission is terminated - Reads the next byte and compares it with the current packet number
If an incorrect package number is received, we cancel the transfer - Read the byte and compare it with the reverse package number
If the wrong number is received, then cancel the transfer - We read the package itself (128 bytes)
- Calculate the checksum for the package
Those. the sum of all bytes in the module 256 package - We read one more byte and compare it with the checksum
If the checksum is different, then send the NAK byte and repeat the reception of the packet
If the checksums are the same, we send the ACK byte and get the next packet
In order to cancel the transfer, either the sender or the receiver sends a CAN byte. When one of the parties receives a CAN byte, we issue an error and terminate the connection.
To complete the transfer, the sender:
- Sends an EOT byte
- Waits for NAK byte (If another byte received – Sender error)
- Sends the second byte of EOT
Waits for ACK bytes (If another byte is received – sender error)
To complete the transmission, the receiver (after receiving the first EOT):
- Sends a NAK byte
- Waits for the second byte of the EOT (If another byte is received, the receiver cancels the transmission)
- Sends ACK byte
Implementation of XMODEM
Provides an incomplete implementation of the XMODEM protocol in the directory of the same name. The task is to complete this implementation. We add the expect_byte, expect_byte_or_cancel, read_packet, and write_packet methods in the src/lib.rs file. The implementation should use an internal state of the Xmodem type: packet and start. Before you start, it is highly recommended to read the code that is already there.
I advise starting with the implementation of the expect_byte and expect_byte_or_cancel methods. Then use all four helper methods (including read_byte and write_byte) to implement read_packet and write_packet. To learn how these methods can be exploited, read the transmit and receive functions. These transmit/receive a full data stream using our protocol. Do not forget that the comments contain a lot of useful information. To test your own implementation, you can use the cargo test. After everything in this part works – go to the next part.
Do not use any additional elements from std.
In your implementation, only the elements from std:: io should be used. Other components from std or external libraries should not be used.
Hints:
My reference implementation for {read, write} _packet contains approximately 33 lines of code.
The documentation for io:: Read and io:: Write can be very useful.
Use more operator.
Reading the test code will help you understand what they want from you.
Subphase D: ttywrite
In this sub-phase, we will write a utility for the ttywrite command line. It will allow us to send data to the BROADCOM in raw form and using the XMODEM protocol. Here we just need the xmodem library from the last part. We write all the code in ttywrite/src/main.rs. In the name of testing needs, the script.the sh script is provided. For the work of this script itself, it will be necessary to mention the one mentioned there at the beginning of the socat.
What is a serial device?
A sequential device is any device that receives messages one bit at a time. This is called sequential data transmission. On the other hand, there is also a parallel data transfer, where several bits can be transmitted simultaneously. With the BROADCOM we communicate via UART, which is an example of a serial device.
What is TTY?
TTY is a teletypewriter. This is a rudimentary old fang term, which originally belonged to computer terminals. The term later (by virtue of habit) has become more general and now means any communication devices with a serial interface. It is for this reason that the name of the file from /dev/, which is assigned to the BROADCOM starts with tty.
Command line interface
Procurement of code for ttywrite already analyzes and tests the command-line arguments for proficiency. This uses the structopt crate, which uses clap internally. If you really use the advice to freely study the inside of the repository, you will notice that this thing is present as a dependency in Cargo.toml. structopt generally speaking, its main purpose is to generate code. We stupidly describe the structure of what we want to get and declare the necessary fields, and structopt generates all the necessary code.
If you want to see which flags are there, you can call the application with the –help flag. It will not be superfluous to repeat that if you use the same cargo run to send flags to the application itself, you should use it as a separator. For example, like this: cargo run – –help. Take a look at this reference now. After that, look at the contents of main.rs. Most of all we are interested in the structure of Opt. Compare this with the output of help on the keys of our application.
What happens if the wrong flags are transferred? [invalid]
Try to pass any illegal flags with incorrect parameters. For example, set -f as idk. Where does structopt know that you need to scold the user?
As you can see, there are many different variations of every taste. All of them correspond to different settings of serial devices. While you do not need to know exactly what they are doing in these settings.
Communication with a serial device
In main, you can see the call to serial:: open. This is an open function from the serial rack, which is clearly visible from the name. The open function returns TTYPort, which allows us to read/write from/to the serial device (because it implements io:: Read and io:: Write). Well, it allows you to set various settings for the serial port (via the implementation of the SerialDevice trail).
Writing code
Use the ttywrite utility. The implementation must at least set all the necessary parameters passed through the command line stored in the opt variable from main. If the name of the input file was not passed, then read from stdin. Well, or from the input file otherwise. The data should be redirected to the declared serial device. If the -r flag is set, the data should be passed as is without any fraud. If this flag is not present, then it will be necessary to use the xmodem implementation from the previous sub-phase. After all this, it is necessary to print the number of carefully transmitted bytes (with successful transmission).
For XMODEM transmission, the code must use the Xmodem:: transfer or Xmodem:: transmit_with_progress methods from an obvious library. I recommend transmit_with_progress for this way you can sip the speed count. In the simplest, simplest version, it will look something like this:
fn progress_fn(progress: Progress) {
println!("Progress: {:?}", progress);
}

Xmodem::transmit_with_progress(data, to, progress_fn)
You can check the minimum correctness of the implementation using the script.sh script from the ttywrite directory. When your implementation will remotely resemble the right one, you can see something like this:
Opening PTYs...
Running test 1/10.
wrote 333 bytes to input
...
Running test 10/10.
wrote 232 bytes to input
SUCCESS
Tips & Tricks
You can get the wrapper of the stdin descriptor with the appropriate io:: stdin () function.
Most likely io:: copy () will be very useful.
The main () function in the final implementation may well fit into about 35 lines of code.
Documentation for TTYPort cannot be closed while writing the code.
Why does the test sh script always set the -r switch? [bad-test]
The provided test script always installs our prog-key. In other words, it does not check for lousiness using the XMODEM protocol.


