How To Properly Perform Inversion Management In iOS
This day, we hear more and more about DI. It is mentioned in the chat rooms. Although the pattern is far from being young, many people do not quite understand it.
Often, DI means a framework, for example, typhoon or swinject. In the article, we will discuss in detail the principles of the implementation of DI, as well as the principle of IoC.
DI (Dependency injection) is the process of providing external dependency to a software component. It is a specific form of “IoC” when it is applied to dependency management. In full accordance with the principle of the sole responsibility of the object gives the concern to build the required dependencies external, specifically designed for this common mechanism.
IoC (Inversion of Control) is an important principle of object-oriented programming used to reduce linkage in computer programs.
Despite the fact that the article about DI, we will start our way not with it, but with IoC, for the reason that DI is just one of the IoC types and the picture needs to be seen entirely.
Inversion of Control
To begin with, we’ll figure out what management is. Let’s take the simplest example – the console “Hello world”:
let firstWord = "hello"
let secondWord = "world!"
let phrase = firstWord + "" + secondWord
print (phrase)
In this example, our commands control the data, which is represented by string literals and variables. At this level of abstraction, there is no more control, but we can add it with the help of a ternary operator:
let number = arc4random_uniform(1)
let firstWord = number == 0 ? "hello" : "bye"
let secondWord = "world!"
let phrase = firstWord + " " + secondWord
print(phrase)
Our code has become ambiguous, and now, depending on the random number, the line in the console will change. In other words, the data control our program. This is the banalest and simple example of control inversion.
In a typical iOS application, management is everywhere. The system, the user, the server control the application. The application manages the server, user, and system. Our code contains a huge number of objects that also control each other. For example, an object of the AuthViewController class can manage an object of the AuthService class.
- Such management of objects, in turn, is built from several aspects. First, AuthViewController calls AuthService methods, and secondly, it creates it. All this leads to high object connectivity, the use of AuthViewController becomes impossible without AuthService. This is called a dependency, AuthViewController is completely dependent on AuthService.
There is an opinion that there is nothing wrong with such addictions. As a rule, our controllers are not re-used and go hand in hand with their services all the time supporting the application. But those who have been supporting long-lived applications know that this is not true. Requirements are constantly changing, we find bugs, change the flow, do a redesign. If your application is more complex than several controllers with a couple of buttons and services that are just wrappers for URLSession, then it sinks in dependencies.
The dependencies between classes form a web, sometimes you can find cyclic dependencies. You can not make changes to your classes, because it is not clear how and where they are used, it’s easier for you to create a new method than to change the old one. Replacement of the class and at all turns into pain. The call of its designer is scattered on various methods, which you also have to change. Eventually, you stop understanding what is happening, the code turns into plain text and, armed with a search, you start replacing words or sentences in this text, checking only the compiler errors.
- To prevent such an outcome of events, many principles and techniques have been invented. For example, one of the SOLID principles of the DIP principle describes how to reduce connectivity when calling methods and this is IoC.
DIP (the principle of inversion of dependencies) is one of the five principles of SOLID.
- Abstractions should not depend on details. Details should depend on abstractions.
But still, when someone says “IoC”, he means management inversion when creating dependencies. Next, we will use it only in this sense. By the way, DIP is almost impossible to implement without IoC, but not vice versa. Using IoC does not guarantee compliance with DIP. Another important nuance. DIP and DI are different principles.
Towards IoC
In fact, IoC is a very simple concept, and you do not need to read a lot of literature, go to Tibet for a few years to understand Zen and start using it.
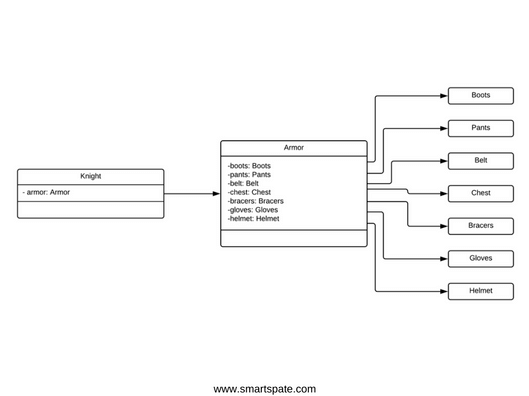
As an example, we will consider the Knight and his Armor class, all classes are shown below.
Now let’s look at the implementation of the Armor class
class Armor {
private var boots: Boots?
private var pants: Pants?
private var belt: Belt?
private var chest: Сhest?
private var bracers: Bracers?
private var gloves: Gloves?
private var helmet: Helmet?

func configure() {
self.boots = Boots()
self.pants = Pants()
self.belt = Belt()
self.chest = Сhest()
self.bracers = Bracers()
self.gloves = Gloves()
self.helmet = Helmet()
}

}
and Knight
class Knight {

private var armor: Armor?

func prepareForBattle() {
self.armor = Armor()
self.armor.configure()
}

}
At first glance, all is well. If we need a knight, we’ll just create it.
let knight = Knight()
But not everything is so simple. Unfortunately, surrogate examples cannot convey all the pain that this approach carries.
Our classes are welded together. In the make method, Armor creates 7 classes. This makes the classes stiff. With this approach, we can not simply determine where and how the class is created. If you need to inherit from the armor and create, for example, a parade armor, replacing the helmet, we will have to redefine the whole method.
- The only plus in this approach is the speed of writing code because when creating classes, you do not have to think about the future.
Here is a small example of how it might look in life:
class FightViewController: BaseViewController {

var titleLabel: UIView!
var knightList: UIView!

override func viewDidLoad () {
super.viewDidLoad ()

self.title = "Tournament"
// Next in the code are mixed unrelated actions, which makes it difficult to change them individually
// Create dependency
let backgroundView = UIView ()
// Add to the screen
self.view.addSubview (backgroundView)
// Customize the appearance
backgroundView.backgroundColor = UIColor.red
// Set the positioning
backgroundView.translatesAutoresizingMaskIntoConstraints = false
backgroundView.translatesAutoresizingMaskIntoConstraints = false
backgroundView.leadingAnchor.constraint (equalTo: leadingAnchor) .isActive = true
backgroundView.topAnchor.constraint (equalTo: topAnchor) .isActive = true
backgroundView.trailingAnchor.constraint (equalTo: trailingAnchor) .isActive = true
backgroundView.bottomAnchor.constraint (equalTo: bottomAnchor) .isActive = true

let title = Views.BigHeader.View ()
self.titleLabel = title
title.labelView.text = "labelView"
self.view.addSubview (title)
title.translatesAutoresizingMaskIntoConstraints = false
title.leadingAnchor.constraint (equalTo: leadingAnchor) .isActive = true
title.topAnchor.constraint (equalTo: topAnchor) .isActive = true
title.trailingAnchor.constraint (equalTo: trailingAnchor) .isActive = true
title.heightAnchor.constraint (equalToConstant: 56) .isActive = true

let knightList = Views.DataView.View ()
self.knightList = knightList
knightList.titleView.text = "knightList"
knightList.dataView.text = ""

self.view.addSubview (knightList)
knightList.translatesAutoresizingMaskIntoConstraints = false
knightList.leadingAnchor.constraint (equalTo: leadingAnchor) .isActive = true
knightList.topAnchor.constraint (equalTo: title.topAnchor) .isActive = true
knightList.trailingAnchor.constraint (equalTo: trailingAnchor) .isActive = true
knightList.heightAnchor.constraint (equalToConstant: 45) .isActive = true
}

}
Such code is easy to meet in someone’s project. It perfectly illustrates that creating dependency classes in arbitrary places is not a good idea. In addition, unlike armor, the elements here are not only created but are configured and even positioned. The code turned into a mess.
How can this be improved? Use the “factory method” pattern. He will not solve all problems but will make the class more flexible.
The factory method (also known as the Virtual Constructor) is a generative design pattern that provides a subclassing interface for instantiating a class.
class Armor {
private var boots: Boots?
private var pants: Pants?

func configure() {
self.boots = makeBoots()
self.pants = makePants()
}

func makeBoots() -> Boots {
return Boots()
}

func makePants() -> Pants {
return Pants()
}
}
Better already, the creation of dependencies is rendered in separate methods. They simply find, just change without risking damaging the logic of the class. When inheriting, we can override them and thereby redefine the dependencies.
But still, our class does not need to know about the details of creating its dependencies, it should just use them. How to deal with this? It is necessary to take out the generating logic from the class to the level above.
class Armor {
private var boots: Boots?
private var pants: Pants?

func configure(boots: Boots?, pants: Pants?) {
self.boots = boots
self.pants = pants
}
}
Now our Armor class has no idea how its dependencies are created, they are simply passed as arguments. This gives maximum flexibility. We can even replace classes with protocols and completely disregard implementation details.
But here at our Knight class things are not going so well.
class Knight {

private var armor: Armor?

func preapreForBattle() {
self.armor = Armor()
let boots = makeBoots()
let pants = makePants()
self.armor?.make(boots: boots, pants: pants)
}

func makeBoots() -> Boots {
return Boots()
}

func makePants() -> Pants {
return Pants()
}

}
He creates all parts of his armor. You can say that our knight is his own blacksmith.
This is wrong, knights should not forge armor, not their level of task, but how then to be? You can again bring the generating logic to a higher level, but then the class at the top of the graph will be a huge dump for creating dependencies.
- To help us will come to another generating pattern – the “factory”.
We will build a smithy in which parts of armor will be made and will be assembled in a single package.
class Forge {
func makeArmor() -> Armor {
let armor = Armor()
armor.boots = makeBoots()
armor.pants = makePants()
return armor
}

func makeBoots() -> Boots {
return Boots()
}

func makePants() -> Pants {
return Pants()
}
}
Classes Armor and Knight will get rid of the generating logic and will look laconically.
class Armor {
var boots: Boots?
var pants: Pants?
}

class Knight {

var armor: Armor?

}
Now we are faced with the question: how, where and when to take dependencies from the “factory” and pass it to our classes. And, therefore, we finally came to the concepts of DI and SL.
Service Locator (SL)
Let’s start, perhaps, with this pattern. First, it is simpler. Secondly, many people think that this is DI, although it is not.
SL (service locator) is a design pattern used in software development for encapsulating processes associated with obtaining a service with a strong level of abstraction. This template uses a central registry, known as the “service locator”, which, on request, returns information (usual objects) required to perform a specific task.
- What is its essence? The class in order to get the dependencies, the “factory” is passed to the designer, from which he chooses what to get.
In this case, our classes will look like this:
class Forge {

func makeArmor() -> Armor {
let armor = Armor(forge: self)
return armor
}

func makeBoots() -> Boots {
return Boots()
}

func makePants() -> Pants {
return Pants()
}
}
class Knight {

private let forge: Forge
private var armor: Armor?

init(forge: Forge) {
self.forge = forge
configure()
}

private func configure() {
armor = forge.makeArmor()
}
}
class Armor {

private let forge: Forge

private var boots: Boots?
private var pants: Pants?

init(forge: Forge) {
self.forge = forge
configure()
}

private func configure() {
boots = forge.makeBoots()
pants = forge.makePants()
}

}
let forge = Forge()
let knight = Knight(forge: forge)
Personally, we have such an approach is a dual feeling. On the one hand, the generating logic is in the “factory”, on the other hand, the process of obtaining dependencies is somewhat confusing.
- But the main drawback is that looking at the class, you can not unambiguously determine its dependencies. He can get everything from the “factory” anything, a typical development error is the creation of one such “factory” for the entire application. At the same time, the “factory” turns into a huge garbage dump and gives rise to the temptation to get inside the classes what they really do not need. Classes lose contact, restrictions.
One can imagine that our knight was presented with a treasure chest, from which he can get the armor he needs, but nobody will prevent him from gaining unnecessary jewelry in the makeweight.
It is for this reason that this pattern crossed the line between good and evil and turned into an antipattern. If you have a choice between DI and SL, always choose DI.
Dependency injection
The second way to deliver dependencies to classes is DI. Currently, this is the most common pattern. It is so popular that in the backend world all normal frameworks support it out of the box. Unfortunately, we were not so lucky.
The essence of this pattern is that the dependencies are embedded in the class from the outside, while the dependency graph is built inside the DI container, which is a “factory” or a set of “factories.”
At the same time our classes look like this:
class Armor {
var boots: Boots?
var pants: Pants?
}

class Knight {
var armor: Armor?
}

class Forge {

func makeArmor() -> Armor {
let armor = Armor()
armor.boots = makeBoots()
armor.pants = makePants()
return armor
}

func makeBoots() -> Boots {
return Boots()
}

func makePants() -> Pants {
return Pants()
}

}
class Garrison {
lazy var forge: Forge = {
return Forge()
}()

func makeKnight() -> Knight {
let knight = Knight()
knight.armor = forge.makeArmor()
return knight
}
}
let garrison = Garrison()
let knight = garrison.makeKnight()
In this case, the classes look clean, they completely lack the generating logic. The responsibility for the assembly was assumed by two “factories”: Garrison and Forge. If desired, the number of these “factories” can be increased to prevent the growth of classes. It is good practice to create a “factory” responsible for creating any kindred objects. For example, this “factory” can create services, controllers for a particular user story.
At the same time, our knight finally finished doing things that are not proper to his status, his armor is responsible for his ammunition, and the knight can concentrate on duels and princesses.
This could be completed, but it’s worth talking about some aspects of DI and currently available frameworks.
Types of DI
Initializer Injection – the introduction of dependencies through the designer. This approach is used when a class can not exist without its dependencies, but even if it is not, then it can be used to more explicitly define a class contract. If all dependencies are declared as arguments to the constructor, it is easy to define them. But do not get carried away, if the class has a dozen dependencies, it’s better not to pass them in the constructor (or even better understand why your class has so many dependencies).
class Armor {
let boots: Boots
let pants: Pants

init(boots: Boots, pants: Pants) {
self.boots = boots
self.pants = pants
}
}

class Forge {

func makeArmor() -> Armor {
let boots = makeBoots()
let pants = makePants()
let armor = Armor(boots: boots, pants: pants)

return armor
}

func makeBoots() -> Boots {
return Boots()
}

func makePants() -> Pants {
return Pants()
}

}
Property Injection – the introduction of dependencies through properties. This method is used when the class has optional dependencies, without which it can do, or when the dependencies can change not only during the initialization phase of the object.
class Armor {
var boots: Boots?
var pants: Pants?
}

class Forge {

func makeArmor() -> Armor {
let armor = Armor()
armor.boots = makeBoots()
armor.pants = makePants()
return armor
}

func makeBoots() -> Boots {
return Boots()
}

func makePants() -> Pants {
return Pants()
}

}
Method Injection – the introduction of dependencies through a method. This method is very similar to Property Injection, but with it, you can implement a temporary dependency only at the time of an action, or more closely associate the implementation of the dependency with the logic of the class.
class Knight {
private var armor: Armor?

func winTournament(armor: Armor) {
self.armor = armor
defeatEnemy()
seducePrincess()
self.armor = nil
}

func defeatEnemy() {}

func seducePrincess() {}
}

class Garrison {
lazy var forge: Forge = {
return Forge()
}()

func makeKnight() -> Knight {
let knight = Knight()
return knight
}
}

let garrison = Garrison()
let knight = garrison.makeKnight()

let armor = garrison.forge.makeArmor()
knight.winTournament(armor: armor)
According to my observations, the most common types are Initializer Injection and Property Injection, less often Method Injection. And although we have described typical cases of choosing one or another type, it must be remembered that Swift is a very flexible language, providing more options for choosing a type. So, for example, even with optional dependencies, you can implement a constructor with optional arguments and nil by default. In this case, you can use the Initializer Injection instead of the Property Injection. In any case, this is a compromise that can improve or worsen your code, and the choice is yours.
Dependency Inversion Principle
Simple use of IoC, as in the examples above, in itself, brings good dividends, but you can go further and achieve the principle of DIP from SOLID. To do this, we will close the dependencies with protocols, and only “factories” will know which implementation is behind this protocol.
class Knight {
var armor: AbstractArmor?
}

class Forge {

func makeArmor() -> AbstractArmor {
let armor = Armor()
armor.boots = makeBoots()
armor.pants = makePants()
return armor
}

func makeBoots() -> Boots {
return Boots()
}

func makePants() -> Pants {
return Pants()
}

}
In this case, we can easily replace the implementation of the reservation with an alternative.
Scope of Visibility
By itself, the management of the scope of objects is not part of the IoC concept, it is rather the details of its implementation, but nevertheless, it is a very powerful mechanism that allows you to abandon singletons and solve other problems with common dependencies. The scope defines how long the dependency created inside the “factory” will live, whether it will be created every time again or saved after the first creation and simply transferred by reference.
- Since the scope is not described in the patterns, everyone implements and names them as they see fit. We will consider the two most commonly used types.
The standard scope is the behavior that we implemented in all the examples above. “Factory” creates an object, gives it back and forgets its existence. When you call the factory method again, a new object will be created.
The scope of the container is a behavior similar to a singleton. The first time the factory method is called, a new object is created, then the “factory” stores a reference to it and returns it as a result of the factory method, with all other method calls, a new object is not created, but a reference to the first object is returned.
class Forge {
private var armor: AbstractArmor?

func makeArmor () -> AbstractArmor {
// If the armor is already created we will return it
if let armor = self.armor {return armor}
let armor = Armor ()
armor.boots = makeBoots ()
armor.pants = makePants ()
self.armor = armor
return armor
}

func makeBoots () -> Boots {
return Boots ()
}

func makePants () -> Pants {
return Pants ()
}

}
As you can see, in the example above, the armor is created only once, in all other cases. Like the singleton, we will always work with the same instance of the class, without the global scope.
Advantages and disadvantages
Like any other principle in programming, IoC is not a silver bullet, it has its advantages:
- Reduces class connectivity;
- It’s easier to re-use classes;
- More compact classes due to the removal of striking logic;
- Encapsulates generating logic, which makes it easier to refactor;
- Hides the implementation;
- Simplifies the replacement of the implementation;
- Simplifies testing: by changing “factories”, you can replace the dependencies with mokes;
- Allows fumbling objects in the application without using a singleton.
And cons:
- Increases the number of classes when the implementation is hidden behind abstraction;
- Increases the dive time in the project;
- It can easily lead to overengineering.
Though my opinion is that the main objective is to follow the principle of DIP. Often you can see how a stack of protocols is created, it closes twice as much as a plump pack of protocols, and this kind of proxies the call of one method.
If you think that it’s good to create a protocol, first think about why. Do you have interchangeable classes that need to be hidden behind a common interface? You need to hide the implementation, but you can not do without the access modifier? For testing? Maybe there will be enough inheritance for most?
Summarizing
In our opinion, compliance with the principles of IoC is a prerequisite for the development of a project that will be supported, and not just forgotten after the release. If we look beyond the iOS sandbox, we find that in the android development, the use of DI, is embodied in the form of a dagger framework, has become almost standard.
In the backend world, for example, in the spring, dependency management. Even php-frameworks such as Laravel, for example, call for the use of DI and provide the necessary tools out of the box. Unfortunately, iOS did not have a boxed solution. Yes for Objective-C can be considered as such a Typhoon, but not for Swift.
Fortunately, you do not need to use a well-known framework. One of the purposes of this article was to show that IoC is not a freighter and that if there is no typhoon in the project, it does not mean DI there. To implement IoC in the project it does not matter whether you choose DI or SL, a fairly ordinary “factory”, which you can write yourself. This “factory” is the simplest DI container.
