
How To Create A Telegram Bot With AI in 30 Lines Of Code In Python!
Today a thought occurred to me: “Why not write Telegram to a chat-bot with AI, which then it will be possible to train?”
Now it’s easy to do, so without thinking twice, I started writing code.
By language, I chose Python, because it’s the easiest to work with such applications.
So, to create a telegram chat-bot with AI we will need:
- API Telegram. As a wrapper, I took a verified python-telegram-bot library
- API AI. I chose a product from Google, namely Dialog flow. It provides a pretty good free API. The Dialog flow wrapper for Python
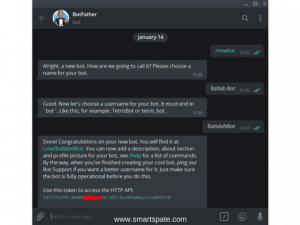
Step 1. Create a bot in Telegram
We come up with a name for our bot and write @botfather. After the creation of the bot, the API should be sent to us, which we have to save somewhere for the future needs.
Step 2. Now, write the basis of the bot
Create a Bot folder, in which we then create the bot.py file. Here is the code of our bot.
Open the console and go to the directory with the file, install python-telegram-bot.
pip install python-telegram-bot --upgrade
After the installation, we can already write a “foundation”, which for now will simply respond with the same type of messages. We import the necessary modules and register our API token:
Setting and Import Code
# Settings
from telegram.ext import Updater, CommandHandler, MessageHandler, Filters
updater = Updater (token = 'YOUR API KEY') # Token API to Telegram
dispatcher = updater.dispatcher
Next, we write 2 command handlers. These are callback functions that will be called when the update is received. Let’s write two such functions for the /start command and for any plain text message. Two parameters are passed there as arguments: bot and update. Bot contains the necessary methods for interacting with the API, and update contains information about the incoming message.
Callback code
# Processing commands
def startCommand (bot, update):
bot.send_message (chat_id = update.message.chat_id, text = 'Hello, let's talk?')
def textMessage (bot, update):
response = 'Got your message:' + update.message.text
bot.send_message (chat_id = update.message.chat_id, text = response)
Now it remains only to assign these handlers to notifications and start searching for updates.
This is done very simply:
Handler code
# Handlers
start_command_handler = CommandHandler ('start', startCommand)
text_message_handler = MessageHandler (Filters.text, textMessage)
# Add handlers to the dispatch
dispatcher.add_handler (start_command_handler)
dispatcher.add_handler (text_message_handler)
# Getting Started for Updates
updater.start_polling (clean = True)
# Stop the bot if Ctrl + C was pressed
updater.idle ()
And, the full basis of the script looks like this:
# Settings
from telegram.ext import Updater, CommandHandler, MessageHandler, Filters
updater = Updater (token = 'YOUR TOKEN API') # Token API to Telegram
dispatcher = updater.dispatcher
# Processing commands
def startCommand (bot, update):
bot.send_message (chat_id = update.message.chat_id, text = 'Hello, let's talk?')
def textMessage (bot, update):
response = 'Got your message:' + update.message.text
bot.send_message (chat_id = update.message.chat_id, text = response)
# Handlers
start_command_handler = CommandHandler ('start', startCommand)
text_message_handler = MessageHandler (Filters.text, textMessage)
# Add handlers to the dispatch
dispatcher.add_handler (start_command_handler)
dispatcher.add_handler (text_message_handler)
# Getting Started for Updates
updater.start_polling (clean = True)
# Stop the bot if Ctrl + C was pressed
updater.idle ()
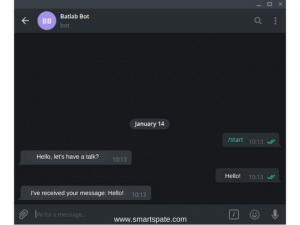
Now we can test the performance of our new bot. We paste our API token on line 2, save the changes, move it to the console and run the bot:
python bot.py
After the launch, we write to him. If everything is configured correctly, you will see this:
The basis of the bot is written, we proceed to the next step!
P.s. do not forget to turn off the bot, for this go back to the console and press Ctrl + C, wait a couple of seconds and the bot will successfully complete the work.
Step 3. Setting the AI
First of all, we go and register on Dialog flow (just log in with your Google account). Immediately after the authorization, we get to the control panel.
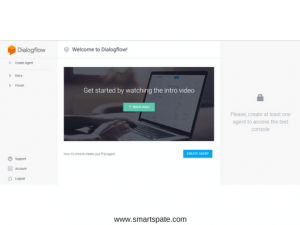
Now, select a Create agent button and fill in the fields at our discretion (this will not play any role, it is only necessary for the next action).
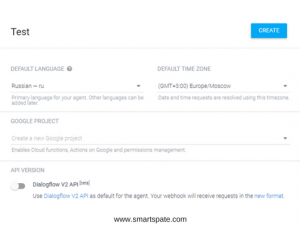
Click on Create and see the following picture:
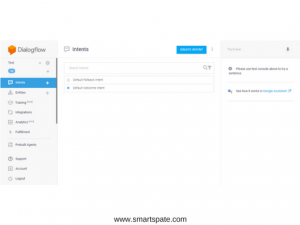
I’ll tell you why the “Agent” we created earlier does not play any role. In the Intents tab, there are “commands” on which the bot works. Now he can only respond to phrases such as “Hello”, and if he does not understand, he answers “I did not understand you”. Not very impressive.
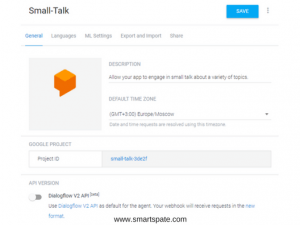
After creating our empty agent, we have a bunch of other tabs. We need to click on Prebuilt Agents (these are already specially trained agents that have many teams) and select Small Talk from the entire list.

We click on it and click Import. Further nothing changing, click Ok. The agent was imported and now we can configure it. To do this, in the upper left corner click on the gear near the Small-Talk and get to the settings page. Now we can change the agent’s name as desired (I leave it as it was). We change the time zone and in the Languages tab, we check that the Russian language has been set (if not installed, then set).
Return to the General tab, go down a bit and copy Client access token
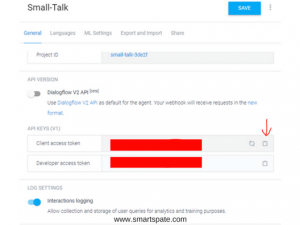
Now our AI is fully integrated, you can go back to the bot.
Step 4. Putting it all together
AI is ready, the base of the bot is ready, what’s next? Next, we need to download the wrapper API from Dialog flow for python.
pip install apiai
Installed? We return to our bot. Add to our “Settings” section the import of apiai and json modules (you need to disassemble the responses from dialogflow in the future). Now it looks like this:
Code of updated settings
# Settings
from telegram.ext import Updater, CommandHandler, MessageHandler, Filters
import apiai, json
updater = Updater (token = 'YOUR API KEY') # Token API to Telegram
dispatcher = updater.dispatcher
Go to the function textMessage (which is responsible for receiving any text message) and send the received messages to the Dialog flow server:
Code for sending messages to Dialogflow
<span style="font-family: arial, helvetica, sans-serif; color: #333333; font-size: 14pt;">This code will send a request to Dialogflow, but we also need to extract the answer. Adding a couple of lines, total <span style="font-family: terminal, monaco, monospace; color: #ffffff; background-color: #ffcc00;">text message</span> looks like this:</span>
<h4><span style="color: #000000;"><strong><span style="font-family: arial, helvetica, sans-serif;">Full code of the text message function</span></strong></span></h4>
[sourcecode language="python"]

def textMessage (bot, update):
request = apiai.ApiAI ('YOUR API TOKEN'). text_request () # Token API to Dialogflow
request.lang = 'ru' # In which language will the request be sent
request.session_id = 'BatlabAIBot' # ID Sessions of the dialog (you need to learn the bot afterwards)
request.query = update.message.text # We send a request to the AI with a message from the user
responseJson = json.loads (request.getresponse (). read (). decode ('utf-8'))
response = responseJson ['result'] ['fulfillment'] ['speech'] # We parse JSON and pull out the answer
# If there is an answer from the bot - we send it to the user, if not - the bot did not understand it
if response:
bot.send_message (chat_id = update.message.chat_id, text = response)
else:
bot.send_message (chat_id = update.message.chat_id, text = 'I do not quite understand!')
A few explanations.
request.getresponse().read()
The response is from the server, encoded in bytes. To decode it, we simply apply the method.
decode('utf-8')
And after that, we “wrap” everything in:
json.loads()
To disperse the json response.
If there is no answer (more precisely, json always comes, but there is not always an array with an AI response), it means that Small-Talk did not understand the user (you can study later). Therefore, if there is no “answer”, then we write to the user “I do not quite understand!”.
Total, the full bot code with AI will look like this:
Full bot code with AI
# Settings
from telegram.ext import Updater, CommandHandler, MessageHandler, Filters
import apiai, json
updater = Updater (token = 'YOUR TOKEN API') # Token API to Telegram
dispatcher = updater.dispatcher
# Processing commands
def startCommand (bot, update):
bot.send_message (chat_id = update.message.chat_id, text = 'Hello, let's talk?')
def textMessage (bot, update):
request = apiai.ApiAI ('YOUR API TOKEN'). text_request () # Token API to Dialogflow
request.lang = 'ru' # In which language will the request be sent
request.session_id = 'BatlabAIBot' # ID Sessions of the dialog (you need to learn the bot afterwards)
request.query = update.message.text # We send a request to the AI with a message from the user
responseJson = json.loads (request.getresponse (). read (). decode ('utf-8'))
response = responseJson ['result'] ['fulfillment'] ['speech'] # We parse JSON and pull out the answer
# If there is an answer from the bot - we send it to the user, if not - the bot did not understand it
if response:
bot.send_message (chat_id = update.message.chat_id, text = response)
else:
bot.send_message (chat_id = update.message.chat_id, text = 'I do not quite understand!')
# Handlers
start_command_handler = CommandHandler ('start', startCommand)
text_message_handler = MessageHandler (Filters.text, textMessage)
# Add handlers to the dispatch
dispatcher.add_handler (start_command_handler)
dispatcher.add_handler (text_message_handler)
# Getting Started for Updates
updater.start_polling (clean = True)
# Stop the bot if Ctrl + C was pressed
updater.idle ()
Save the changes, run the bot and go check:
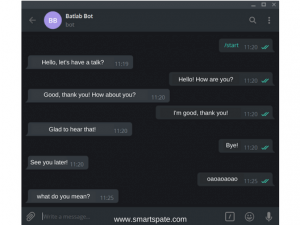
That’s all! Bot in 30 lines of code with AI integration!
Step 5. The final part
I think you were convinced that writing a bot with AI is 10 minutes. It remains only now to teach and teach. You can do this, by the way, in the Training tab. There you can see all the messages that were written and that the bot responded to them (or did not answer). There it can also be trained, telling the bot where he answered correctly, and where not.

I hope the article was useful to you, good luck in learning!

