How To Creating A Server For Testing Android REST-Queries in 4 Simple Steps
Not so long ago, there was a need to implement in android application communication with the server API through REST-requests.
Implementing the software on Android was not a big deal, due to the availability of a handy and simple Retrofit library. However, writing a couple of GET/POST requests to existing open APIs (for example, Github and other standard examples of Retrofit), it became necessary to start testing the logic of the application.
In this case, of course, we would like to have our own server containing our data models and interrelationships between the models, as well as different levels of access to specific data models. In this article, we would like to tell you how to create a local server in a few small steps, add the necessary models, configure the relationships between them and provide remote access to this server.
At once we would like to clarify, in order to avoid misunderstanding on the part of the readers: we, as well as those for whom this article is intended, is a novice in the implementation of the server part, caught by the will of circumstances in a situation in which we were forced to quickly raise api, for testing Android applications.
1. NodeJS and Loopback
The first thing that needs to be clarified right away, the server will be implemented using the Node.js-Loopback framework. First, install Node.js. itself. The latest version of Node.js is located on the site nodejs.org/en/download, download it and install it.
After that, run the command line and enter the following command and wait for the process to finish:
npm install -g loopback-cli
2. Creating an application
To create a new application (your server) for the Loopback framework, go to the directory where your server will be located, enter the lb command, and answer a series of questions about the application, among which:
- The name of the application (in our case, test_server)
- A directory name, for the project (leave blank, then in this directory, a folder with the project name will be created)
- The version LoopBack (choose the current version)
- The form of the application (formally speaking – the application template.) Choose api-server)

After the application creation process is complete, go to the created folder with the application files and try to run it with the following command:
node .
The application runs on the local address: localhost: 3000/explorer. In this case, the application already has a User model and a number of REST-functions.
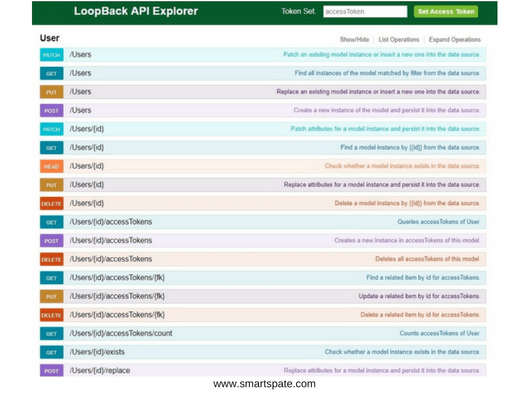
Formally speaking, your server is ready and successfully processes local requests. You can check the availability and operation of the server using the Postman application or your android application.
3. Models and relationships
Next, you need to create data models and the relationships between them. Consider a simple example of a model and relationships: imagine that our application gives feedback on movies. You enter the name of the movie and should receive all the reviews for this particular movie. Thus in the database you, in the most primitive case, should store two models: Movie (has fields: name, year) and Review (author, description). The relationship between the models is the following, one film can have many reviews.
So the REST request to the movies will have such a link localhost:3000/api/Movies and to the list of reviews such as localhost: 3000/api/Movies/{id}/Reviews
Let’s create these two models on the server:
lb model
Answer the following questions about the model:
- The model name (for example, Movie)
- The data source for connection (choose db (memory))
- Base class of the model (choose PersistedModel)
- Show the model with the REST API (Yes)
- Custom multiple forms (leave empty)
- General model or only server (choose common)
Now the model is created and you need to add fields to it (for Movie, for example, name and year):
- Property name (for example, name)
- Property type (for example, string)
- Is it compulsory (Yes)
- Show the model with the REST API (Yes)
- The default value (leave empty)
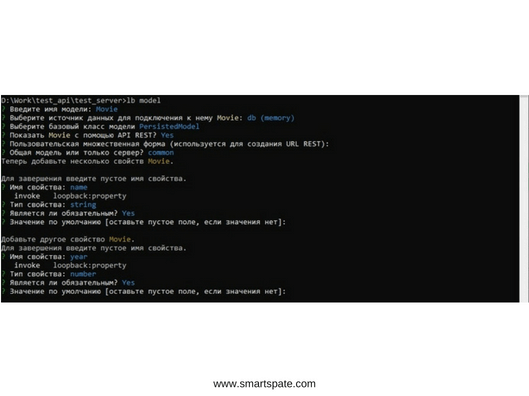
After adding all the properties, after seeing the suggestion to add one more, just press “Enter”. Also, we add the second model.
Now you need to adjust the relationship between them. We write a team and answer the questions:
lb relation
- Select a model, to create a relationship (for example, Movie)
- Type of connection (choose as many (one to many), since one film has many reviews)
- Choose a model for the relationship (in this case, Review)
- Name of the link (any, we will write reviews)
- Custom key (leave empty)
- Intermediate model (No)
- Enable attachment of links (No)
- Disconnect from the following connected objects (No)

All. Now start the server with the same command as before and look at localhost: 3000/explorer. We see that we have our models and see the relationship between them through id.

4. Remote access to the server
Now access to the server is limited to the home network, which is not entirely convenient when testing from the phone. Let’s try to make your server remotely. To do this, you need to download ngrok, unpack it in any convenient place and run it. This program is designed to create a tunnel for your localhost: 3000, to create a remote access for it on the generated link. Enter the following command in ngrok:
npm install ngrok -g
ngrok http 3000
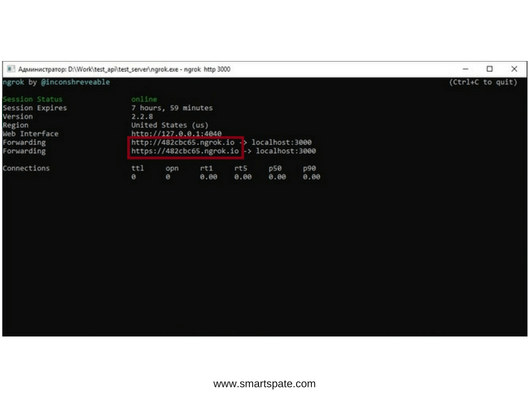
We see that the program has created a tunnel and now your server is accessible by the link provided. Keep in mind that every time you restart your PC, the link in ngrok will change.
Conclusion
The above was a fairly crude and dry description of the process of creating the simplest NodeJs server, for testing your android application. Naturally, there are a lot of nuances associated with even those 4 steps that we described.
In addition to what we’ve already described, just one command can change the level of access to api and organize user authentication.


