
How To Convert A Basic USB Into Driven One!
Somehow I needed a hub long ago, preferably with a large number of ports and with a fairly convenient form suitable for embedding instead of a floppy disk drive into the 3.5 ”bay.
A quick look at the flea market threw the model D-link DUB-H7, and even in the combination “2 for the price of 1”. The external inspection did not give anything special, the hub as a hub, made soundly, a major “printer” USB AM-BM on the back and 3 A power supply. As always, the first thing I did was disassembled, I was glad for a small number of empty places instead of elements together with high-quality soldering and calmed down.
True, just in case, I went to the Internet to see what the hub was and if there were any interesting projects with its participation. There were no projects, user reviews 50/50, in general, no dynamics. The hub for 5-7 years worked reasonably well and performed its task, then moved smoothly into the box for electronic junk and quite possibly would have disappeared as a result along with unknown adapters, etc. made me dig in bags with old junk, find this, as it turned out, a unique D-link, and shaking off the dust to remove it into the light of God. If it’s interesting to listen to why – welcome to my short tutorial.
Intro or Crying about greedy USB hub manufacturers
With the advent of small convenient SoC routers (such as the clone of the popular Chinese mini-router Hame A15, also “unbranded A5-V11”) and the widespread adoption of openwrt for managing devices (in the absolute majority of cases, these are devices connected via USB) the task of managing the power supply of various modems, card readers, USB-rs232 converters, etc., etc. becomes a very urgent task.
Most often there is a need to control the port when working with GSM Emami (to restart, for example). In principle, people have already gained enough solutions. For these purposes, starting from using free GPIO pins in the router, and ending with ready-made relays. There are solutions from third-party manufacturers. This is, for example, a programmable USB hub for 4 ports from Acroname, which is also rich in software and software but costs about $300.

There is a cheaper option, a smart switchable hub with the pleasant name Yupkit YKUSH for only €35:

The most economical ones can use a bundle of the cheapest USB hub, a normally closed 5V relay, and any of the Arduino-k to disconnect power from the USB port if necessary. The cost of such a solution is <$ 10, without taking into account the time spent on soldering and programming Arduino.
- It would seem a dead end. Either expensive and beautiful or just plain and snotty. But it turned out there is a third option. Moreover, the decision is as old as the USB 2.0 specification for hubs in which it is described.
Excerpts from the specification regarding USB power management
It is not required. Bus-powered hubs are required to have power switches. If you are a group of gangs, you can connect to one or more ports. A hub indicates the field of power in the wHubCharacteristics. If a hub is supported, it is a request for the port. Power-off or Not Configured States. If a hub is supported, it receives a SetPortFeature (PORT_POWER) request. It is not a state.
Although it’s not necessary to implement power switching, it’s a hub of state for all ports. Additionally, it is necessary to implement the USB System Software (PbwrCtrlMask).
- It turns out that the USB standard has already spelled out the ability to control the power of the ports, using the so-called. Per-Port Power Switching (PPPS), but to meet a device that would support this feature is not just hard, but very hard. To implement PPPS functionality, additional components (field-effect transistors and piping) are needed, which are not installed in hubs in order to save.
Sensitively responding to market demands, some manufacturers indicate in the hub specifications the PPPS function, but in fact, the case on the box does not go further. And in principle, it is difficult to find fault, because many chips inside the hubs support this function, but it’s impossible to implement it without additional switches (transistors) (most often USB ports are directly connected to the + 5V line).
I even specially disassembled several small USB hubs that I planned to use together with the A5-V11 router. Inside it turned out: the GL850G chip and the hotly beloved by the Chinese FE1.1s. Naturally, only the controllers themselves were found inside with a minimum of details. In view of the miniature size of the board, it is difficult to place even a hinged wiring of the transistor and the parts that joined it. I had to calm it down. Although, depending on the chip, if there is a mention of over-current detection or an individual or ganged power control in the datasheet, you can perform an operation on the smart-test of such a device using the method described in the article.
Alteration scheme and appearance of the device


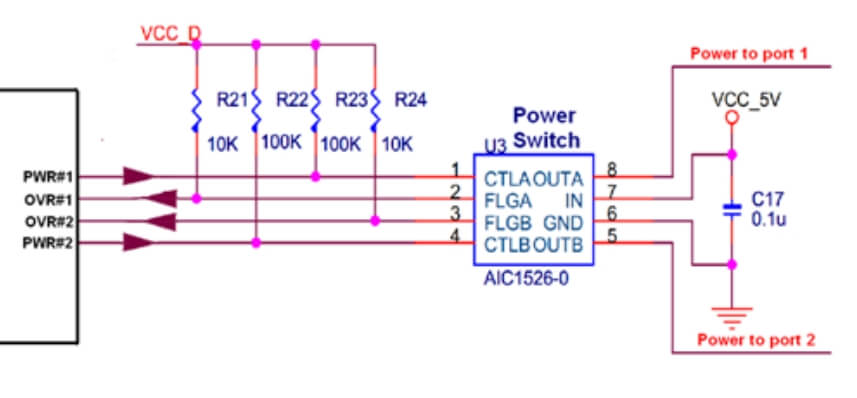
Also reading the documentation, you catch yourself in that there is a no-no and there is a mention that the port control mode can be implemented by adding some AIC1526-0 or MIC2026 (Dual-channel power distribution switch) to the circuit.
Schemes of datasheets will not lie

Main part or go to the point
Overwhelmed with sad thoughts about buying Chinese hubs with unknown functionality (“the cat in the bag”) and the impossibility of checking them beforehand, I inadvertently came across an article about setting up openwrt for power management of a USB hub, moreover The forgotten D-Link DUB-H7 in a gray case.

After examining the hardware, it became clear that on board the hub, in addition to the fairly advanced Philips ISP1521BE controller, there is a whole bunch of those dual-channel power distribution switches AIC1528-0 for full power switching. Although judging by the datasheet, the chip with a minimum body kit itself can control the power of downstream ports (and there are still a lot of things, as it turned out, not implemented, for example, indication of upstream port activity using GoodLink technology, or a USB 1.1 host to correctly support a mix of 2.0 and 1.1 downstream ports, etc., etc.).
By the way, for those who decide to repeat the path I have passed, I will say straight away that the modern versions of the D-Link DUB-H7 (in a glossy black case) are not as useful as the old men of gray.

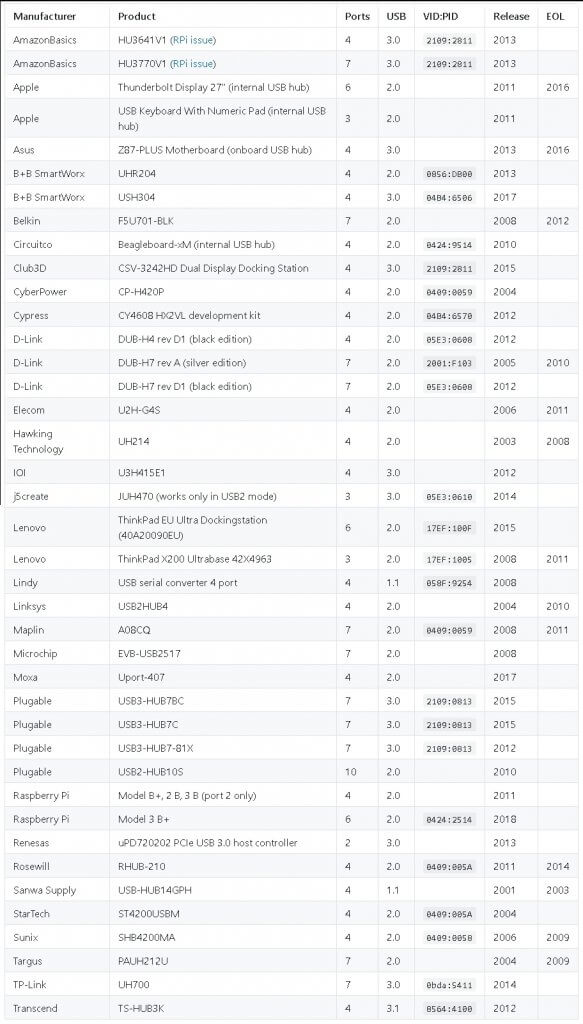
According to information from wikidevi.com (1,2,3,4), there are several revisions of this hub, with a different set of components on board, and, accordingly, with different functionality (A1 / A5 – ISP1521BE 7-port, B1-2xGL854G 4-port, C1 – 2xGL850Z 4-port).
Attention to the D-Link DUB-H7 is also drawn because, in addition to its good functionality, it is also the most affordable (both in price and prevalence) option in our area. From the models that could be mentioned along with “Per-Port Power Switching”, you can additionally mention, for example, the following:
- Linksys USB2HUB4 USB 2.0 hub.
- D-Link DFB-H7 Combo Hub
- Elecom U2H-G4S
- Sanwa Supply USB-HUB14GPH
- Targus Inc. PAUH212
- Hawking Technology UH214
I wasn’t able to search for the mentioned devices, because I was once lucky with the revision version A5. But now, if I had to buy such a hub, I would try to find revision B1, because besides managing the portable power supply, the chip on which it is built (GL854G) has such a thing as a Multi Transaction Translator inside.

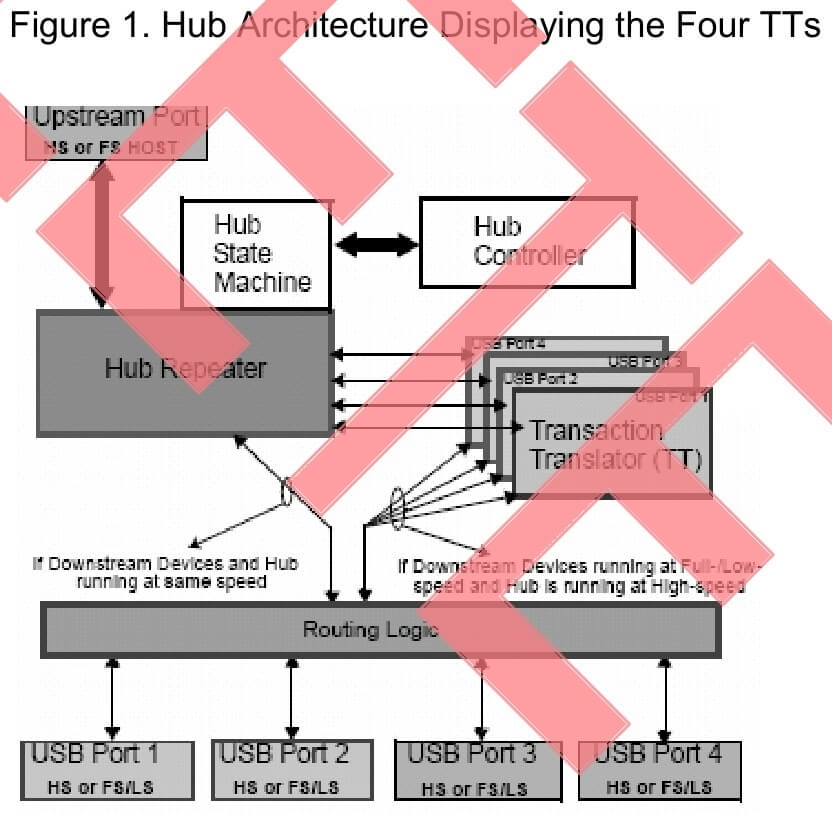
The importance of having a Multi Transaction Translator (MTT) in a USB hub
A small digression to tell what this Multi Transaction Translator (MTT) is and why it is so important and necessary. The transaction transmitter (English transaction translator, TT) is an important component of any high-speed hub that provides communication between the upstream and downstream ports of the hub, especially in the case when these ports operate at different data rates. In fact, TT separates low- and medium-speed devices from high-speed devices (especially USB 2.0, for example) and is responsible for operating at USB 1.1 speeds.
Transmitter operation can be of two types – single (English Single Transaction Translator, STT) or multiple (English Multiple Transaction Translator, MTT). In the case of STT, one transmitter is used for all ports, and in the case of MTT, each port has its own transmitter. It is clear that the first option is cheaper and simpler, where the main drawback of this option comes from – in the case of connecting several USB 1.1 ports to a hub, they will all work through a single “bottleneck”. I think you can imagine what will happen to the exchange rate.
In simple terms, STT-hubs have a limit on the number of devices that can be used simultaneously. Otherwise, it is fraught with packet loss due to conflicts in scheduling data transmissions, overloading the hub (especially when using actively communicating devices, such as sound cards), etc. Therefore, it is better when choosing a hub to immediately focus on devices with MTT, and not to look after the cause of instability in the work. If there is already a hub, and unfortunately it turned out to be from the STT, all that remains is to carefully check the standards of the devices connected to the hub and, if possible, reduce the number of connected USB 1.1 to one.
Unfortunately, the vast majority of low-cost hubs built on low-end chips (fe1.1s, GL850G, and my A5 hub’s ISP1521BE) have STTs on board, more expensive and advanced (GL852G, GL854G (B1 revision discussed by D-link DUB-H7), GL3520, VL812, VL813, SMSC USB2514) are running MTT.
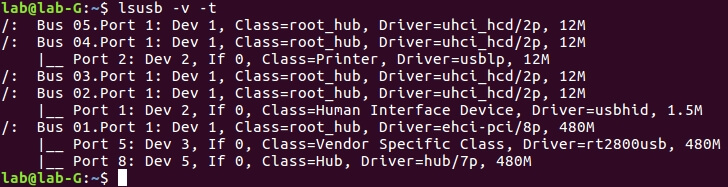
You can check the type of transmitter operation either by reading the datasheet on the chip (but often the Chinese cannot or do not want to tell the chip’s brand), or by connecting the hub to a computer with * nix and running the lsusb -v command and finding the piece of service information related to the hub under investigation name). The line DeviceProtocol will indicate either Single TT or Multi TT. It is clear that it is better to buy only with Multi
When you run the lsusb -v -t command, you can see a nice hierarchical structure of the connected USB-devices.
Instead of lsusb, you can use the hwinfo utility with the –usb key (it is desirable to pre-install it via sudo apt-get install hwinfo). Then the output of information about usb devices will look a little different:
In general, briefly with the peculiarities of the work of low-speed devices have figured out and now is the time to go to the software part.
The managing of the power of USB ports
I’ll say right away that I couldn’t find a way to implement PPPS functionality in a Windows environment (at least out of idle interest). Maximum – enable/disable the device using the devcon utility. I would be glad if someone from the readers corrected and supplemented. In the meantime, all procedures are carried out using the example of Ubuntu (in the case of openwrt, the algorithm is similar, although in the last trunk it should already be included in the “distribution”).
So, the possibility of Per-Port Power Switching (PPPS) or “port-based power switching” is implemented on hubs with hardware support for this function using the hub-ctrl program or its descendant uhubctrl. I will consider them in turn.
HUB-CTRL
The program is written by Japanese fighter for independence engineer Niibe Yutaka back in 2006. But it works without problems now. For installation, we need any * nix and libusb-dev library. For example, Ubuntu 16.04 LTS algorithm is as follows:
Install additional. packages: sudo apt-get update && sudo apt-get install libusb-dev git gcc
Download the source: git clone https://github.com/codazoda/hub-ctrl.c
Compile with gcc: cd hub-ctrl.c && gcc -o hub-ctrl hub-ctrl.c -lusb
If the address is unavailable, you can manually download the sources from here or from here and compile with the command described above.
The program has a fairly simple command line syntax that falls into the following description:
./hub-ctrl [{-h HUBNUM | -b BUSNUM -d DEVNUM}] \ [-P PORT] [{-p [VALUE] | -l [VALUE]}]
where HUBNUM is the hub number, BUSNUM bus number, DEVNUM device number, PORT port number
To find out these parameters, just run the lsusb command:

By the way, the hub-ctrl program can act as a kind of “probe” of a usb hub for the fact that it has the ability to manage port power. It is enough to run it with the -v key. We get a list of supported hubs in the system (the INFO line) and the status of the ports (in my case, all the ports are turned off).
lab@lab-G:~/hub$ sudo ./hub-ctrl -v
Hub #0 at 001:006
INFO: individual power switching.
WARN: Port indicators are NOT supported.
Hub Port Status:
Port 1: 0000.0000
Port 2: 0000.0000
Port 3: 0000.0000
Port 4: 0000.0000
Port 5: 0000.0000
Port 6: 0000.0000
Port 7: 0000.0000
And this is what the configuration will look like when all ports are turned on:
lab@lab-G:~/hub$ sudo ./hub-ctrl -v
Hub #0 at 001:006
INFO: individual power switching.
WARN: Port indicators are NOT supported.
Hub Port Status:
Port 1: 0000.0100 power
Port 2: 0000.0100 power
Port 3: 0000.0100 power
Port 4: 0000.0100 power
Port 5: 0000.0100 power
Port 6: 0000.0100 power
Port 7: 0000.0100 power
To enable any of the ports you need to run the command sudo ./hub-ctrl -h 0 -P 1 -p 1, where -h indicates which hub is used (0th in my case), -P tells which port (1- th port in my case), and -p indicates the status (0-off, 1-on).
To get the configuration as in the picture above, it was necessary to execute the following commands sequentially (for the ports that were initially disabled):
<span style="font-family: arial, helvetica, sans-serif; color: #333333; font-size: 14pt;">sudo ./hub-ctrl -h 0 -P 2 -p 1</span>
<span style="font-family: arial, helvetica, sans-serif; color: #333333; font-size: 14pt;">sudo ./hub-ctrl -h 0 -P 4 -p 1</span>
<span style="font-family: arial, helvetica, sans-serif; color: #333333; font-size: 14pt;">sudo ./hub-ctrl -h 0 -P 6 -p 1</span>
Accordingly, it is not difficult to write a script that will cause the LEDs to flash for fun in the desired sequence. Examples of such things already exist and successfully function:
Morse code on a usb hub, Christmas tree lights, etc. etc. From the possibilities of hub-ctrl, I didn’t have the function of cyclic inclusion for the realization of my momentary lighting fantasies (so as not to waste time writing the script, etc.) This annoying flaw is eliminated in the successor – uhubctl.
Uhubctl
The uhubctl program is an optimized analog of hub-ctrl and has some cosmetic differences (and, of course, supports more devices). How To Convert A Basic USB Hub Into Driven One!
Work with uhubctl:
Theoretically, the utility can be compiled to run in a windows environment, but … But for now, it interacts with devices via the winusb.sys driver, which cannot directly access the hub. Also, the program claims USB 3.0 support (USB 3.0 hubs supporting Per-Port Power Switching, by the way, is much more than USB 2.0 hubs with similar functionality). When working with a USB 3.0 hub connected to a USB 3.0 upstream port, the program defines it as two independent virtual hubs: USB 2.0 and USB 3.0, and the USB devices themselves will be connected to one of them depending on their capabilities and connection speed. Accordingly, to control such devices, the program turns on/off power on virtual hubs by default (you can switch the utility to manual mode by adding the –e switch to the start command).
Important: the addressing system for USB ports can cause some confusion (it is similar for hub-ctrl and uhubctl). During operation, it uses the same addressing method similar to that in the Linux kernel: b-x.y.z, where b is the USB bus number and x, y, z are the port numbers of the node chain starting from the root USB hub for this bus. If there is more than one managed USB hub, you can determine the correct parameters by running uhubctl with the -l (location) parameter. I note that this addressing is semi-stable — it will not change if you unplug and plug the USB devices back to the same physical port.
The algorithm for compiling a program is similar to the algorithm for hub-ctrl. Except for the fact that you additionally need to install the library libusb-1.0 (version 1.0.12 or later) by the usual command, sudo apt-get install libusb-1.0-0-dev, and then compile the binaries with the command make.
The syntax for running the program next
<span style="font-family: arial, helvetica, sans-serif; color: #333333; font-size: 14pt;">uhubctl -a off -p 2</span>
This command shuts off power (-a off, or -a 0) on port 2 (-p 2). Supported off/on/cycle (or 0/1/2) commands. The cycle key turns off the power, waits a while (determined by the -d key) and turns it back on. Those. Now the hub can easily replace the microcontroller.
What follows from all this, or Conclusions
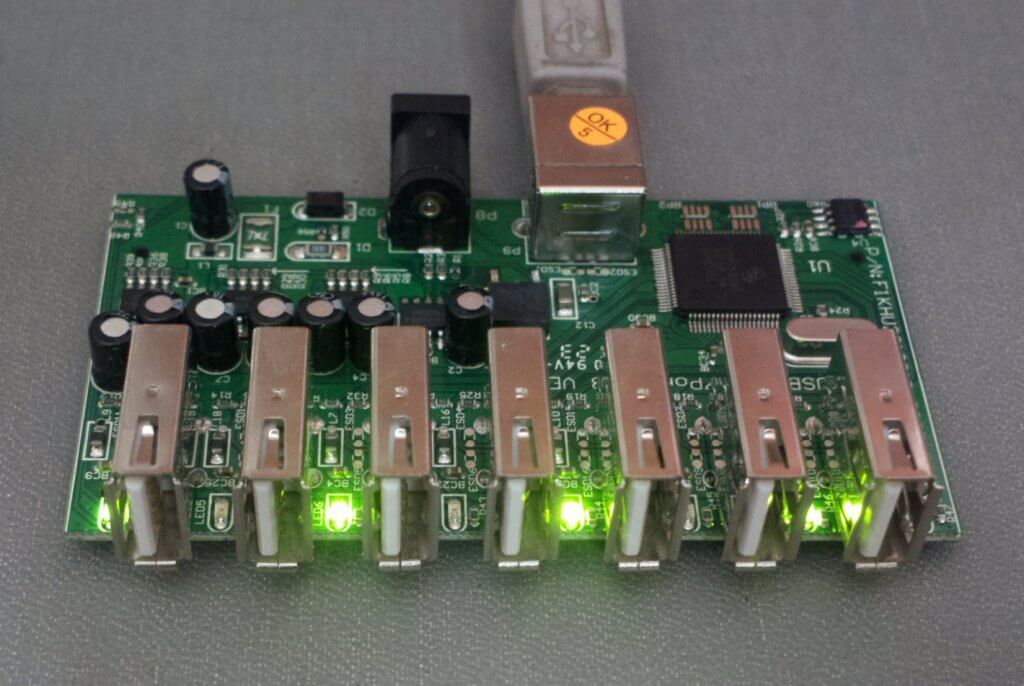
And from this, it follows that there is a “secret” in the old hub from D-Link. The use of the described technology (PPPS) is justified when it is necessary to remotely control an array of devices connected to the USB bus. Moreover, this method is already used to disable hard drives, webcams and GSM modems (such as in the picture):

Although, as for the modems and the D-link DUB-H7 mentioned by me, there are people who question the performance of such a bundle (when working with the hub-ctrl program).
The reason is that …
“… experiments using Dlink DUB H-7 showed that hub-ctrl -p 0 only lowers the voltage to 1.47 V. At the same time, after inserting the modem into such a” disabled port “the LED does not blink, however, modems appear in the system. They can even be opened. However, recording commands and reading responses from this port does not end in success. “
The utilities described in the article (lsusb, hwinfo, hub-ctrl) can be a great help when choosing the next USB hub, especially if there is no access to viewing the internal device. At the Habré, user ideas and expectations from ideal usb hubs were already described (here and here). In my opinion, the described algorithms for checking existing hubs will perfectly complement and dilute the approaches described by the authors. Well and so, after, the hero of my article (D-link DUB-H7 ver. A5) in my opinion looks very good from the point of view of circuit solutions. On this, perhaps, I will take my leave.
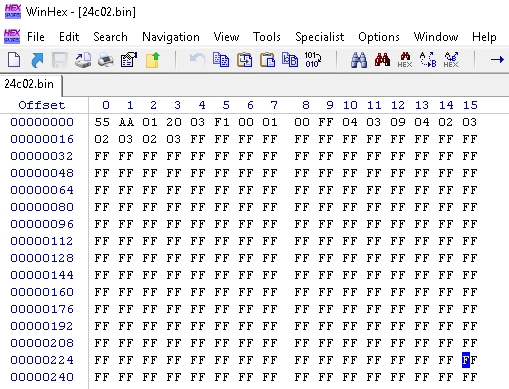
Addition: if suddenly someone needs a firmware dump of the EEPROM 24C02 chip, then it looks like this:
List of used sources
1. simple-is-beauty.blogspot.com/2017/12/usb-port-control.html
2. askubuntu.com/questions/149242/is-it-possible-to-power-up-ports-on-a-usb-hub-from-ubuntu
3. www.ibuyopenwrt.com/index.php/15-yun-compatible/hardware-yun/36-usb-hub-per-port-power-switching-2
4. www.joeldare.com/wiki/usb_powered_animated_christmas_lights
5. michaelbluejay.com/batteries/dc-christmas-lights.html
6. forum.archive.openwrt.org/viewtopic.php?id=49012
7. atotto.hatenadiary.jp/entry/linux-sugoi-usb-hub-power-ctrl
8. hant.helplib.com/GitHub/article_111870
9. www.quaxio.com/hub_ctrl
10. forum.ixbt.com/topic.cgi?id=13:40305-4
11. www.cypress.com/file/124006/download
12. github.com/mvp/uhubctl
13. github.com/crazystick/py-hub-ctrl
14. atc-ip.ru/info/29/1.html


